Revert™ 700 Total Protein Stain
Configurations
P/N |
Description |
926-11010 |
Revert 700 Total Protein Stain Kit, 100 mLSufficient reagent for up to 20 mini blots. Revert 700 Total Protein Stain, 100 mL Revert 700 Wash Solution, 200 mL Revert Destaining Solution, 200 mL |
926-11016 |
Revert 700 Total Protein Stain Kit, 250 mLSufficient reagent for up to 50 mini blots. Revert 700 Total Protein Stain, 250 mL Revert 700 Wash Solution, 500 mL Revert Destaining Solution, 500 mL |
926-11015 |
Revert 700 Total Protein Stain and Wash Solution KitSufficient reagent for up to 20 mini blots. Revert 700 Total Protein Stain, 100 mL Revert 700 Wash Solution, 200 mL |
926-11014 |
Revert 700 Sample PackSufficient reagent for up to 4 mini blots. Revert 700 Total Protein Stain, 20 mL Revert 700 Wash Solution, 40 mL Revert Destaining Solution, 40 mL |
926-11011 |
Revert 700 Total Protein Stain, 100 mLSufficient reagent for up to 20 mini blots. |
926-11021 |
Revert 700 Total Protein Stain, 250 mLSufficient reagent for up to 20 mini blots. |
Specifications
- Shelf Life: 6 months from date of receipt
- Wash Solution: 6.7% (v/v) glacial acetic acid, 30% (v/v) methanol, in water. Revert Destaining Solution: 0.1 M sodium hydroxide, 30% (v/v) methanol, in water.
- Membrane Types: Nitrocellulose or PVDF
Product Description
Revert 700 Total Protein Stain is a membrane stain that fluoresces at 700 nm and does not covalently modify sample proteins and therefore does not affect antibody binding or quantification. Revert 700 Total Protein Stain provides high signal intensity with a broad, linear quantitative range. Stained proteins produce signal that can be detected visibly and by imagers capable of detecting dyes that have excitation and emission maxima near 700 nm. With an imaging system capable of multiplex detection, you can image the total protein stained with Revert 700 Total Protein Stain in the 700 nm channel and image a target protein in the 800 nm channel on the same blot. You can also remove the total protein stain and process the blot to detect two different targets in the 700 and 800 nm channels.
With a total protein stain, you will be able to monitor protein transfer across the entire blot at all molecular weights. This will allow you to determine if there are any irregularities that indicate you should run the blot again to get more robust results.
Applications
In Western blot analysis, normalization is essential for accurate, reproducible comparison of protein levels. Validating housekeeping proteins that are suitable for Western blot normalization adds significant time and cost to experiments. The total protein normalization method using Revert 700 Total Protein Stain provides a quick and reliable method for normalizing target signals.
Method 1: Single-Color Western Blot (800 nm target only)
Use the steps below for detection of a target in the 800 nm channel.
Step 6. Stain with Revert™ 700 Total Protein Stain
- Add methanol to the stain reagents as indicated on each bottle.
-
After transfer is complete, fully dry the membrane. Place the membrane on top of a piece of clean filter paper and allow it to dry by choosing one of the following:
-
40 to 60 minutes at room temperature.
-
10 minutes in an oven at 37 °C.
-
Overnight at room temperature as a stopping point.
-
-
Rehydrate the membrane after fully drying.
-
For nitrocellulose membranes, incubate the membrane in TBS or PBS (no detergent) for 5 minutes at room temperature with gentle shaking.
-
For PVDF membranes, first rehydrate using 100% methanol for 30 seconds. Then rinse in TBS or PBS (no detergent) for 5 minutes at room temperature with gentle shaking.
Do not allow the membrane to dry from this point on.
-
-
Rinse the membrane with ultrapure water.
Before moving to the next step, ensure the membrane container provides a minimum clearance of 1/8th of an inch on all sides. Revert 700 Total Protein Stain will cause the membrane to swell. Without clearance, staining may be uneven.
-
Stain membrane with Revert 700 Total Protein Stain. Incubate the membrane in 5 mL of Revert 700 Total Protein Stain solution for 5 minutes at room temperature with gentle shaking.
For more information about the Revert protocol, see licorbio.com/revert.
-
Decant total protein stain solution thoroughly. Using approximately 5 mL of Revert 700 Wash Solution (P/N 926-11012), rinse the membrane two times for 30 seconds at room temperature with gentle shaking.
-
Decant wash solution thoroughly, then briefly rinse the membrane with ultrapure water.
You do not need to destain Revert 700 Total Protein Stain in this protocol as you will be visualizing your HKP and OLI in the 800 nm channel. If you wish to visualize several HKPs in the 700 nm and 800 nm channels, you can do so by destaining Revert according to the instructions in your pack insert.
Step 7. Image Membrane
Do not allow the membrane to dry during imaging. If you are using an Odyssey M, Odyssey DLx, or Odyssey F, it is best to place the silicone mat on top of the membrane. See the Operator's Manual for your imager for detailed instructions (licorbio.com/support).
-
Immediately image the membrane in the 700 nm channel using an Odyssey Imaging System. If saturation occurs, reduce the scan intensity or acquisition time, or use AutoScan if your instrument includes this.
-
Proceed immediately to blocking and follow your normal Western blot protocol using IRDye® 800CW Secondary Antibody to detect your target in the 800 nm channel.
-
Image the membrane in the 800 nm channel with an Odyssey Imaging System. If saturation occurs, reduce the scan intensity or acquisition time, or use AutoScan if your instrument includes this.
Visible color from stain will wash off during processing and residual total protein signal may be detected in the 700 nm channel.
Method 2: Two-Color Western Blot (700 and 800 nm targets)
Use the steps below for detection of targets in the 700 nm and 800 nm channels. Follow the single-color Western blot steps up until imaging the membrane with Revert™ 700 Total Protein Stain in the 700 nm channel (step 2.1). After imaging the membrane, proceed to the destaining step.
Step 1. Destaining
-
Briefly rinse membrane with ultrapure water.
This step is important for the destaining step to work properly.
-
Incubate the membrane in 5 mL of Revert Destaining Solution (P/N 926-11013) for 5 to 10 minutes, with gentle shaking. Destaining is complete when stain is no longer visible by eye.
Do not destain for longer than 10 min.
Step 2. Process Western Blot
-
Decant destaining solution thoroughly, then briefly rinse the membrane with ultrapure water. Proceed immediately to blocking and immunodetection.
-
Follow your normal Western blot protocol using IRDye® 800CW Secondary Antibody to detect your target in the 800 nm channel and IRDye 680RD Secondary Antibody to detect your target in the 700 nm channel.
It is recommended to use 700 nm channel detection for your most abundant target and the 800 nm channel for weak or low abundance targets.
-
Image the membrane in the 700 and 800 nm channels with an Odyssey Imaging System. If saturation occurs, reduce the scan intensity or acquisition time, or use AutoScan if your instrument includes this.
After destaining and Western blot processing, 1-3% residual fluorescence from Revert may be seen during imaging in the 700 nm channel, but this will not impact results.
Method 3: Total Protein Detection After Western Blot Detection
This method is useful if total protein staining is desired, but not performed on the membrane prior to Western blot detection.
You will image the membrane two times in this protocol, once in step 2 and once in step 5. The first acquisition will be of the target proteins. The second acquisition will be of the Revert 700 Total Protein Stain.
This method only works if the membrane is processed with a protein-free blocking buffer and antibody diluent.
Step 1. Process Western Blot with Protein-Free Antibody Diluent and Blocking Buffer
Block membrane in Intercept® Protein-Free Blocking Buffer and use Intercept Protein-Free Antibody Diluent for primary and secondary antibody incubations.
Step 2. Acquire Image for Target Channel(s)
Image membrane to capture detection channels for target proteins.
Step 3. Rinse Membrane with Ultrapure Water
Rinse the membrane with ultrapure water.
Before moving to the next step, ensure the membrane container provides a minimum clearance of 1/8th of an inch on all sides. Revert 700 Total Protein Stain will cause the membrane to swell. Without clearance, staining may be uneven.
Step 4. Stain with Revert 700 Total Protein Stain
-
Add methanol to the stain reagents as indicated on each bottle.
-
Stain the membrane with Revert 700 Total Protein Stain. Incubate the membrane in 10 mL of Revert 700 Total Protein Stain solution for 5 minutes at room temperature with gentle shaking.
Do not allow the membrane to dry from this point on.
-
Decant the total protein stain solution thoroughly. Using approximately 10 mL of Revert Wash Solution for each wash, rinse the membrane two times for 30 seconds at room temperature with gentle shaking.
-
Decant the wash solution thoroughly, then briefly rinse the membrane with ultrapure water.
Step 5. Acquire Revert 700 Total Protein Stain Image
Do not allow the membrane to dry during imaging. If you are using an Odyssey DLx or an Odyssey M, it is best to place the silicone mat on top of the membrane. See the Operator's Manual for your imager for detailed instructions (licorbio.com/support).
Immediately image the membrane in the 700 nm channel using the Odyssey M Imager.
Western Blot Analysis Using Empiria Studio® Software
Empiria Studio Software is designed for reliable analysis of near-infrared Western blots using publisher guidelines. Create a new experiment in Empiria Studio, then choose the appropriate workflow: Linear Range Validation with Total Protein Stain or Target Analysis with Total Protein Stain. Follow the steps provided in the workflow.
Empiria Studio uses workflows to minimize user-to-user variation, provides more extensive analysis options, and can compute vital statistical values. To get started with Empiria Studio, visit licorbio.com/empiria-support.
Western Blot Analysis Using Image Studio™ Software
Use Image Studio Software for quick signal quantification.
Total Protein Quantification
The Empiria Studio® Software Linear Range Determination workflows guide you step-by-step through this process. For more detailed information, see the Linear Range Determination in Empiria Studio Software (licorbio.com/LinearRangePaper) white paper. The following instructions are for using Image Studio™ Software.
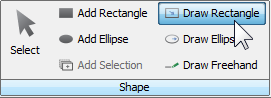
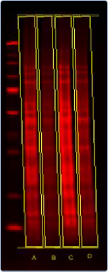
Before you begin, under the Analysis tab change the type to Manual. Use the Draw Rectangle tool in Image Studio Software to quantify the total protein signal in each lane.
|
|

Target Protein Quantification
The Empiria Studio® Software Linear Range Determination workflows guide you step-by-step through this process. For more detailed information, see the Linear Range Determination in Empiria Studio Software white paper (licorbio.com/LinearRangePaper). The following instructions are for using Image Studio™ Software.
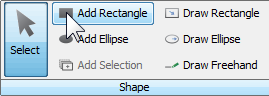
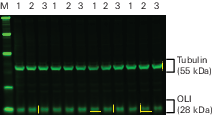
Before you begin, under the Analysis tab change the type to Manual. Use the Add Rectangle tool in Image Studio Software to quantify the target bands.
|
|

Normalization Calculation
-
Open the spreadsheet containing total protein and target quantification values.
-
Calculate the Lane Normalization factor for signal data from the lanes on the Total Protein Stain image.

Channel Lane Name Signal Highest Signal Lane Normalization Factor 700 A 900 1000 0.9 700 B 700 1000 0.7 700 C 1000 1000 1 700 D 800 1000 0.8 Example numbers shown for illustrative purposes only.
-
Calculate the normalized signal for each band by dividing the signal for each band by the Lane Normalization Factor for the lane the band is in.

Channel Lane Name Signal Lane Normalization Factor Normalized Signal 800 A 90 0.9 100 800 B 70 0.7 100 800 C 100 1 100 800 D 80 0.8 100 Example numbers shown for illustrative purposes only.
-
Use the Normalized Signal for quantitative comparisons.
Related Products
| 926-11011 | Revert™ 700 Total Protein Stain |
| 927‑60001 | Intercept® (TBS) Blocking Buffer |
| 927‑70001 | Intercept (PBS) Blocking Buffer |
| 927‑80001 | Intercept (TBS) Protein-Free Blocking Buffer |
| 927‑90001 | Intercept (PBS) Protein-Free Blocking Buffer |
| 927-65001 | Intercept T20 (TBS) Antibody Diluent |
| 927-75001 | Intercept T20 (PBS) Antibody Diluent |
| 927-85001 | Intercept T20 (TBS) Protein-Free Antibody Diluent |
| 927-95001 | Intercept T20 (PBS) Protein-Free Antibody Diluent |
| 928‑60000 | Chameleon® Duo Pre-stained Protein Ladder (for visual and two-color near-infrared detection) |
| 71222.01 | NC 2 Nitrocellulose Membrane 0.22 µm 80 mm x 85 mm |
| 71223.01 | NC 2 Nitrocellulose Membrane 0.22 µm 20 cm x 20 cm |
| 71224.01 | NC 2 Nitrocellulose Membrane 0.22 µm 30 cm x 3 m |
| 71208.01 | NC 45 Nitrocellulose Membrane 0.45 µm 30 cm x 3m |
| 928‑40004 | 4X Protein Sample Loading Buffer (optimized for use with near-infrared detection) |