What's New in Image Studio™ Software
Release Notes
The following release notes for recent Image Studio™ Software versions include both Image Studio stand-alone (without 21 CFR Part 11-Ready features) and the client for Image Studio 21 CFR Part 11.
Image Studio 6.2 can open Work Areas from earlier versions. Once opened in Image Studio 6.2, a Work Area that originated in an earlier version will no longer open in that earlier version. Check with others in your lab before upgrading.
Before You Upgrade
For information about opening Image Studio 6.1 Work Areas in Image Studio 6.2 (including details about pixel-based rulers and scale bars, Morphology Analysis, and saved plate-based analysis templates), see Open Image Studio 6.1 Work Areas in Image Studio 6.2.
Analysis Automation
These highly requested automations enable your image analysis to keep pace with rapid image acquisition on LICORbio® imagers.
-
Analysis Templates - Save an analysis as a template to reuse it on other images, making it easy to run consistent analysis across large image sets. Morphology Analysis templates now support plate configurations, enabling you to associate data with wells. All templates have a description field to keep track of what each template does. For more information, see Analysis Automation.
-
Template Library - Templates for each analysis type are stored in a template library specific to that analysis. When you apply an analysis type that has saved templates, you will see the library of templates (including the template name, description, and automatically saved details for each template) to make it easy to choose the template you need. Template names and descriptions are editable. For more information, see Analysis Automation.
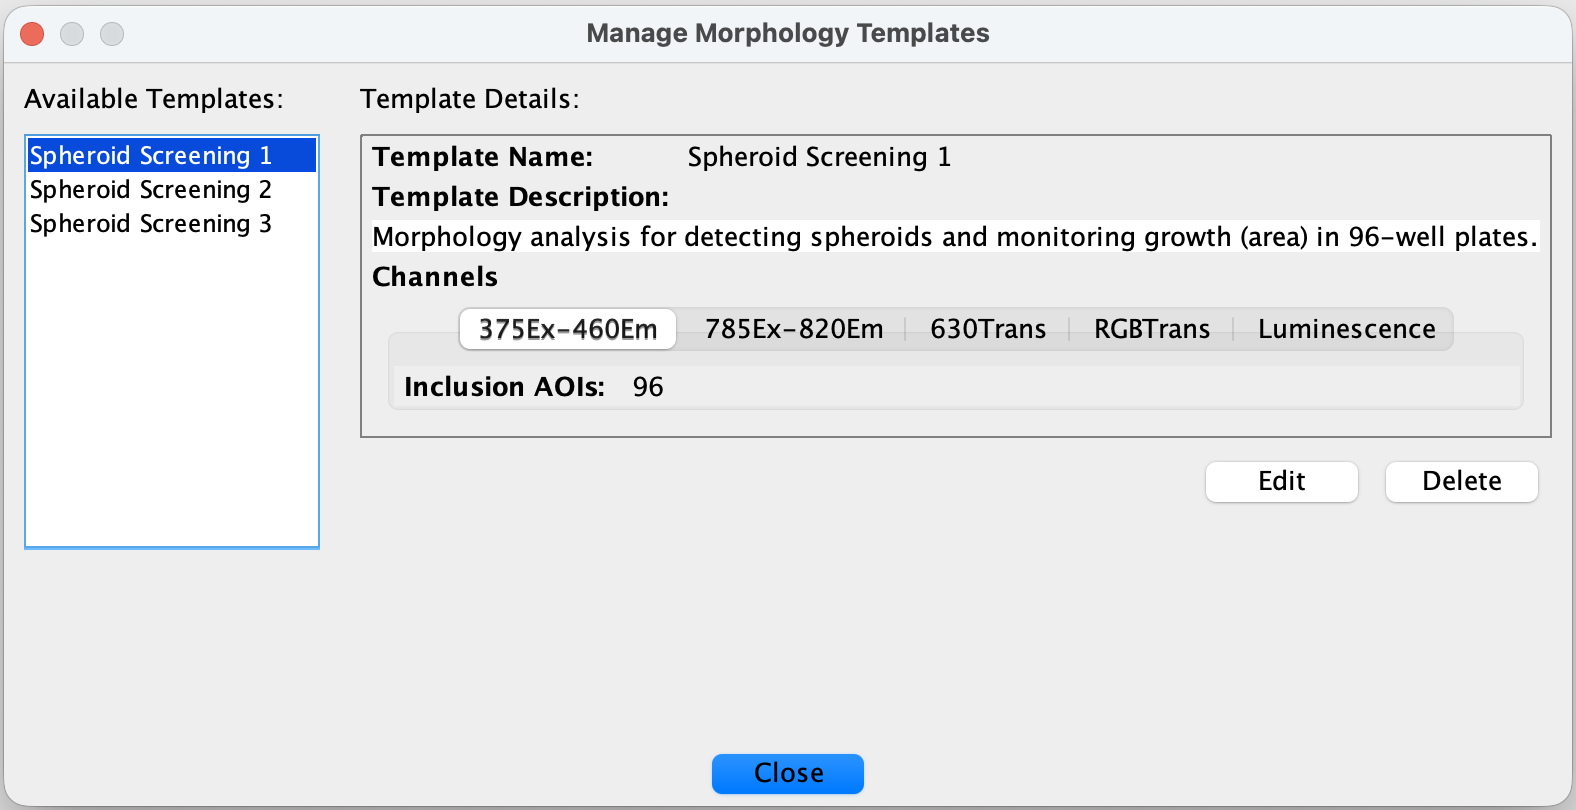
Figure 6. Use the Manage Morphology Templates dialog to see a library of analysis templates and their details. -
Batch Analysis - Apply Plate, Grid, or Morphology analyses to multiple acquisitions at once, so high acquisition throughput can move smoothly into high-throughput analysis. Completed work is preserved if the rest of the batch is canceled. For more information, see Analysis Automation.
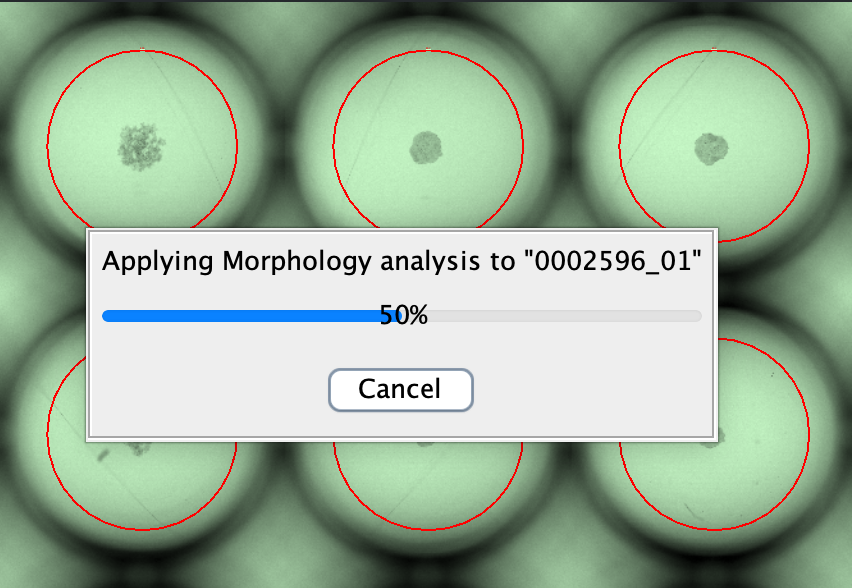
Figure 7. Morphology analysis template being applied in batch to a plate with spheroids.
Acquisition and Image Viewing
Acquisition planning and image review are easier to manage, with scan time estimates shown before scanning and better tools for navigating, comparing, and revisiting images after acquisition.
-
Scan Time Estimates - See scan time estimates before you start a scan, helping you plan acquisition work with more confidence. As soon as parameters required for a scan are set, an estimate appears in the Status group. Estimates are available for LICORbio Atlas™ Imager, Odyssey® M Imager, and Odyssey F Imager.

-
Link View - Use Link View on the Image ribbon to zoom to the same region on similar acquisitions. This makes it much easier to compare the same well across multiple plate images, and it is useful for many other applications. For more information, see Display. You can also link display settings and view settings at the same time.
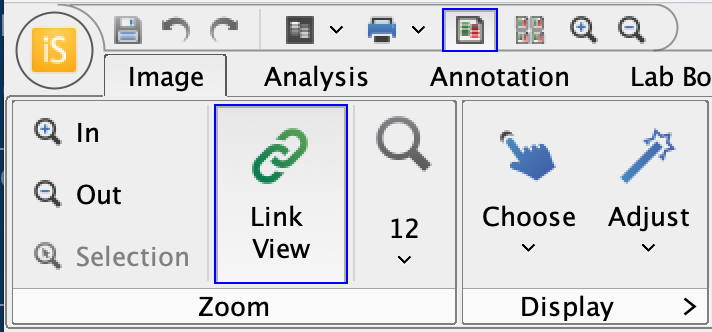
Figure 8. Select acquisitions to compare, filter the Images table to the selection (Filter > Selection), and then click Link View to zoom to the same place on all acquisitions. -
Remembered Zoom Level - Image Studio now preserves your image zoom level between sessions. With the LICORbio Atlas™ Imager, you can acquire large samples in one image without stitching, and remembered zoom lets you see the region you were exploring or analyzing after Image Studio is closed and reopened without spending time looking for it again.
-
Fit-to-View Image Opening - Images now open zoomed to fit the available viewing area, making it easy to see the full acquisition right away without edges hidden off screen. From there, you can zoom in smoothly to inspect the details that matter.
-
Standard Deviation Projections - You can now create Standard Deviation Projections to create a 2D projection based on variation across a set of images, such as acquisitions from a Focus Stack. For more information, see Acquire Tab.
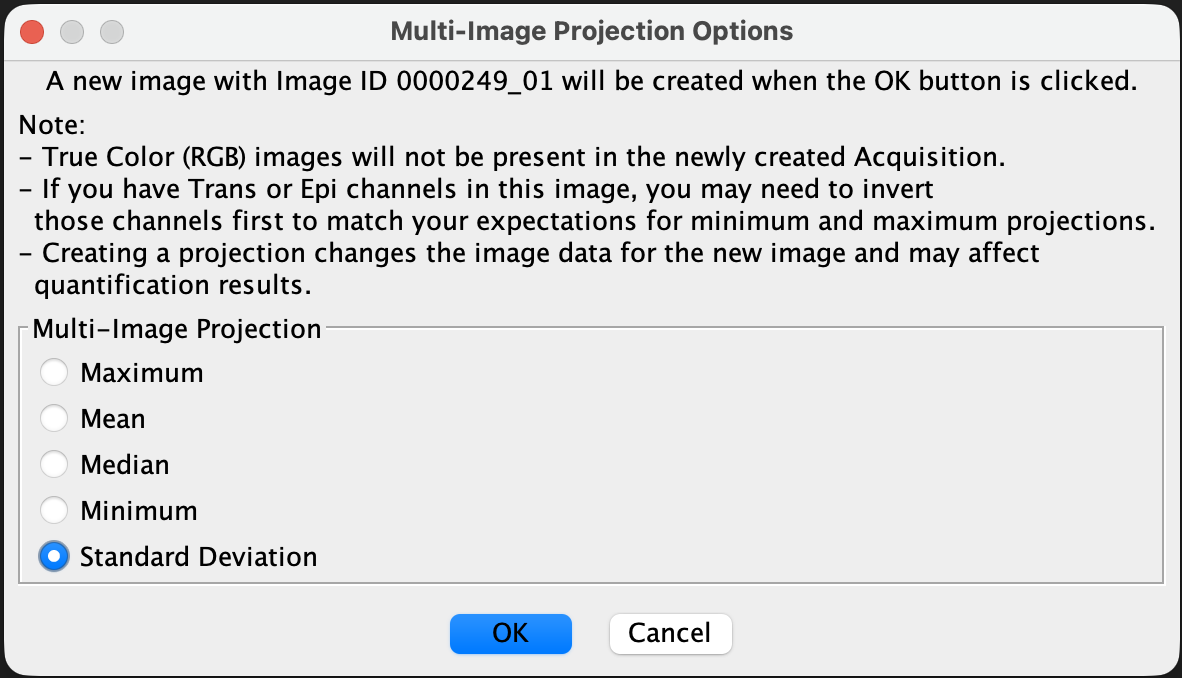
Figure 9. With the acquisitions from your focus stack selected in the Images table, click Create Projection on the Image ribbon to create a standard deviation projection.
Morphology Analysis
Morphology Analysis has been improved for larger, more complex workflows, with user-requested updates that make plate analysis, brightfield analysis, and long-running analysis steps easier to complete.
-
Plate Format Morphology Analysis - Measure and count features inside wells in a full plate image, making Morphology Analysis in plate-based workflows much more powerful. Well positions (e.g., A1, ..., H12) are stored in the Name column of the Morphology Shapes table so that measurements for objects are associated with the wells that the objects are in. For more information, see Morphology Analysis.
-
Morphology Performance Improvements - Large morphology workflows are faster and use memory more efficiently, helping analysis stay responsive as image sets and result counts grow. This includes large plates, large irregular shapes, watershed, and Work Areas with many morphology analyses.
-
Morphology Analysis Progress Indicators and Canceling - Long morphology actions show clearer busy feedback, and there is now a Cancel button to safely end long running processes. Problems with morphology analysis processing being interrupted by scan-completion dialogs have been resolved. Image Studio prevents closing during active morphology work and template application, making longer analysis steps easier to manage. For more information, see Morphology Analysis.
-
Morphology Dialogs and Labels - Threshold Detection, Auto Detection, and Refine Detected Shapes dialogs open fully on screen in more display setups. Shape labels also sit closer to the shape boundary, making results easier to review.
-
Auto Detection for Brightfield and Inverted Images - Auto Detection now supports bright or dark foreground finding, making brightfield and inverted brightfield workflows easier to analyze and apply in batch. For more information, see Morphology Analysis.
-
Inclusion AOI Bug Fix - When Inclusion AOIs are deleted or unassigned, the Morphology Shapes table now updates fully and the correct association between Inclusion AOIs and detected shapes is maintained correctly when the data are exported.
-
Mask Visualization Improvements - Masks stay in sync with channel visibility more reliably after reopening a work area, keeping reopened analyses easier to interpret. Morphology mask channels are also no longer shown as regular image channels in color preferences.
-
Morphology Reliability Improvements - Several morphology edge cases are more reliable, making everyday morphology work smoother. This includes duplicate, undo, copy and paste, border-shape handling, filtered tables, mask tiling, and Feret diameter for simple rectangles.
Compatibility and Platform
-
LICORbio Zip Import Progress - Importing LICORbio zip files now shows progress instead of just a busy cursor. This gives clearer feedback during large imports, including LICORbio Atlas™ workflows.
-
Localization Improvements - Focus values display and sort more reliably across localized formats. Importing data between English and European locales is more consistent.
-
Display Consistency After Rotate and Flip - Rotated and flipped images now keep histograms consistent with the Choose Display dialog, helping with image display consistency across these display-only adjustments.
-
macOS Tahoe Support - Image Studio 6.2 adds support for macOS Tahoe.
-
Platform and Maintenance Updates - Image Studio 6.2 also includes additional bug fixes and usability improvements. Java and third-party libraries were updated for continued platform support and software longevity.
-
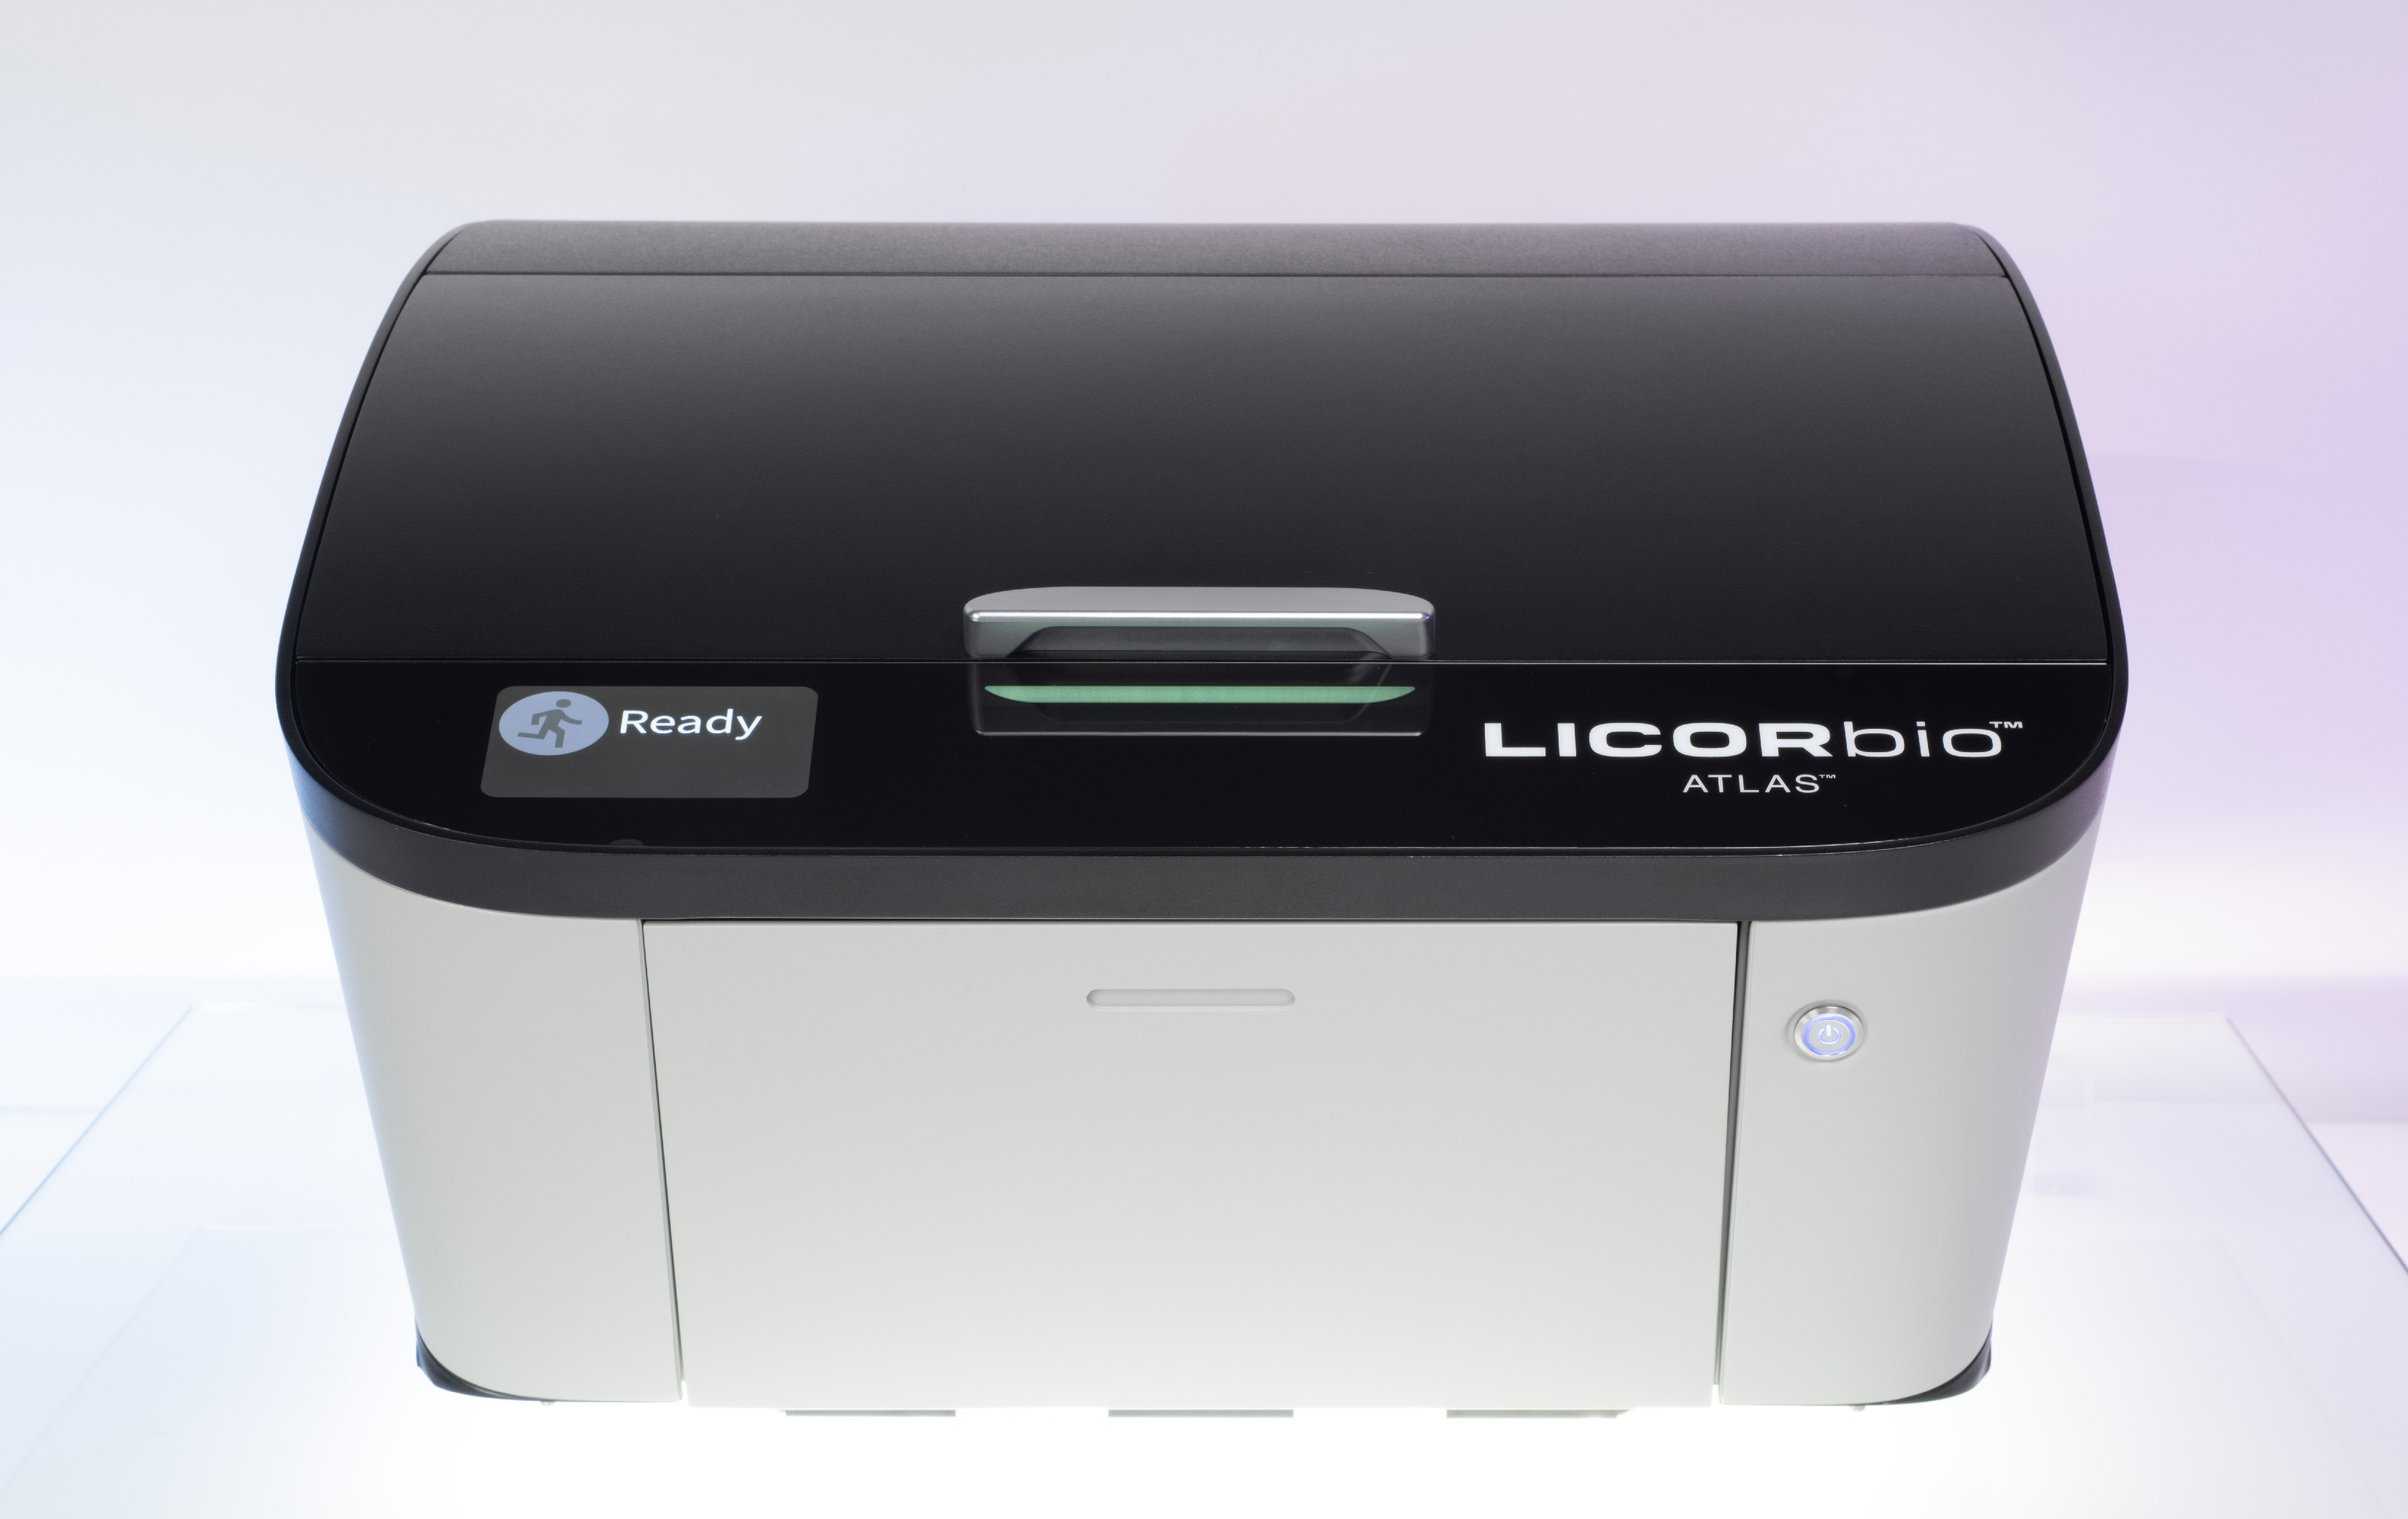
Added support for the LICORbio Atlas™ Imager, the data-rich 2D and 3D cell-based imaging system! New features in Image Studio 6.1 focus on providing access to the new functionality available with the LICORbio Atlas™ Imager.
-
Added Acquisition ribbon options to provide powerful new acquisition capabilities of the LICORbio Atlas™.

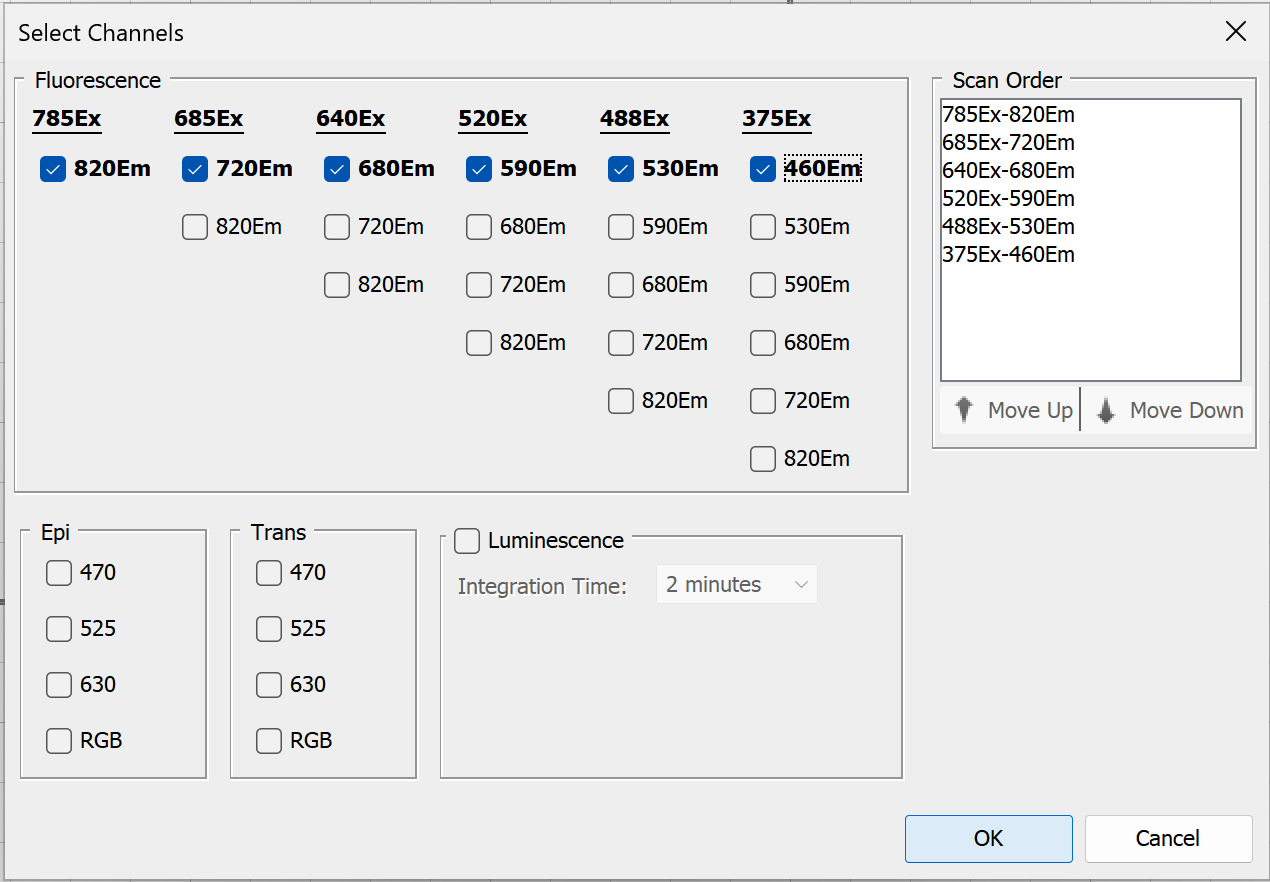
Select from 30 channels, including fluorescence, brightfield transillumination, epi illumination, and luminescence. With the Select Channels dialog, you can select channels in the Scan Order list and then click Move Up and Move Down to choose the order in which channels are scanned (luminescence is always first, when included).
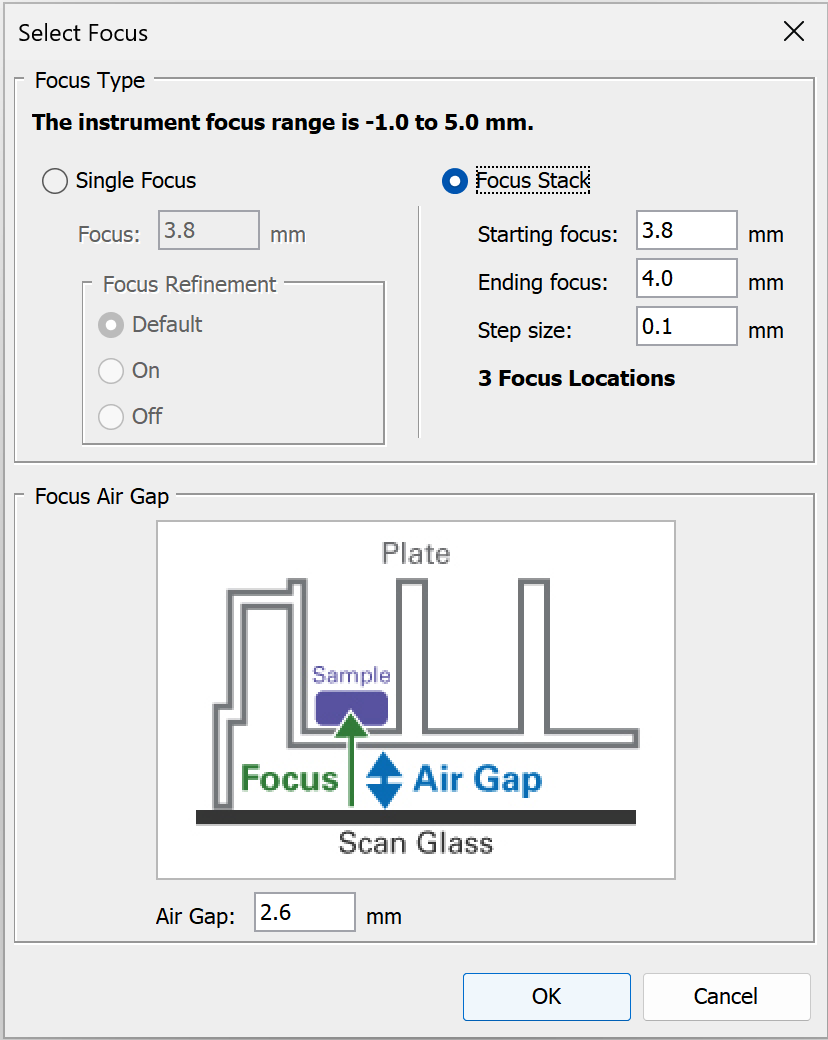
With the new Select Focus dialog, you have more options for precisely specifying the focus you need. With this added functionality, you can choose the Focus Stack option to automatically acquire a series of images at incremented focus offsets. The Focus Stack option creates a z-stack of images that are helpful for evaluating the best focus offset for imaging plates, and for creating maximum intensity projections, mean intensity projections, median intensity projections, and minimum intensity projections. Create a projection from acquisitions in a Focus Stack by selecting the acquisitions in the Images table, then clicking Image ribbon > Create Projection and choosing the projection type you need.
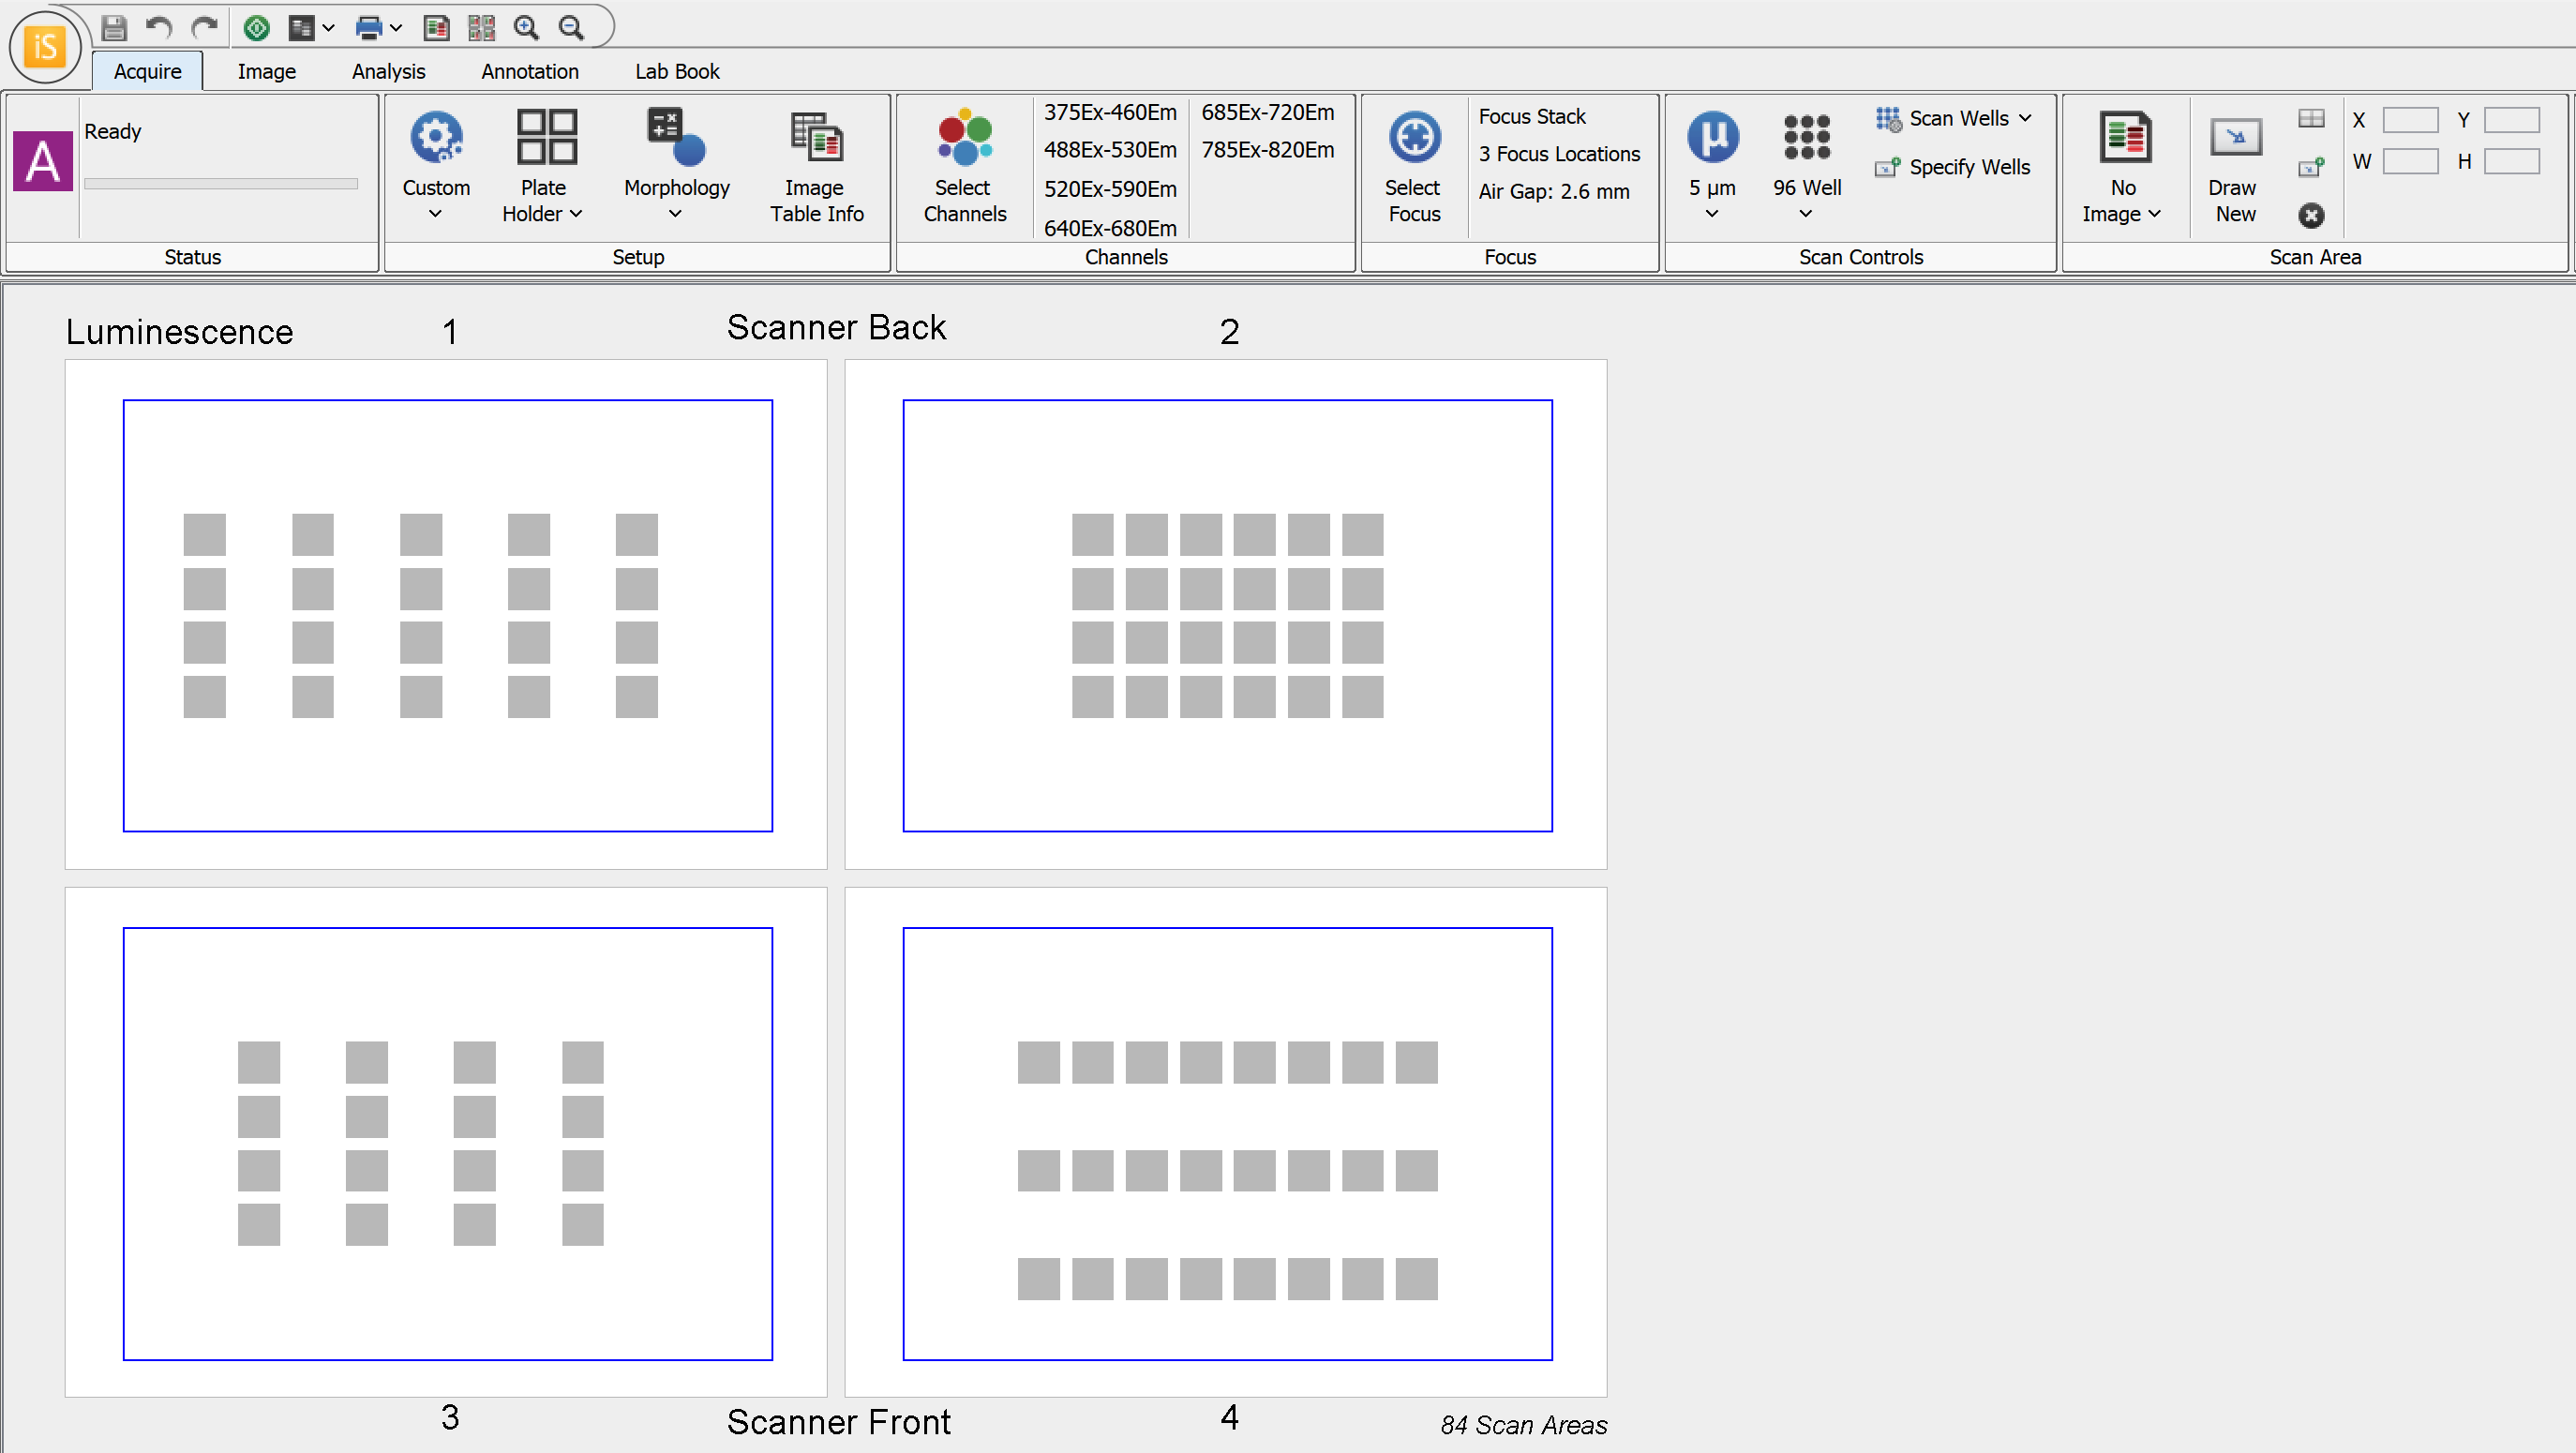
Single well scanning is now available! On the LICORbio Atlas™ Acquisition ribbon, click Scan Wells and then click Specify Wells to select individual wells to scan on all the plates you're imaging. You can select a different set of wells for each plate. This is especially useful for high resolution imaging of individual wells using the Focus Stack feature to get a close look at the spheroids in a plate.
-
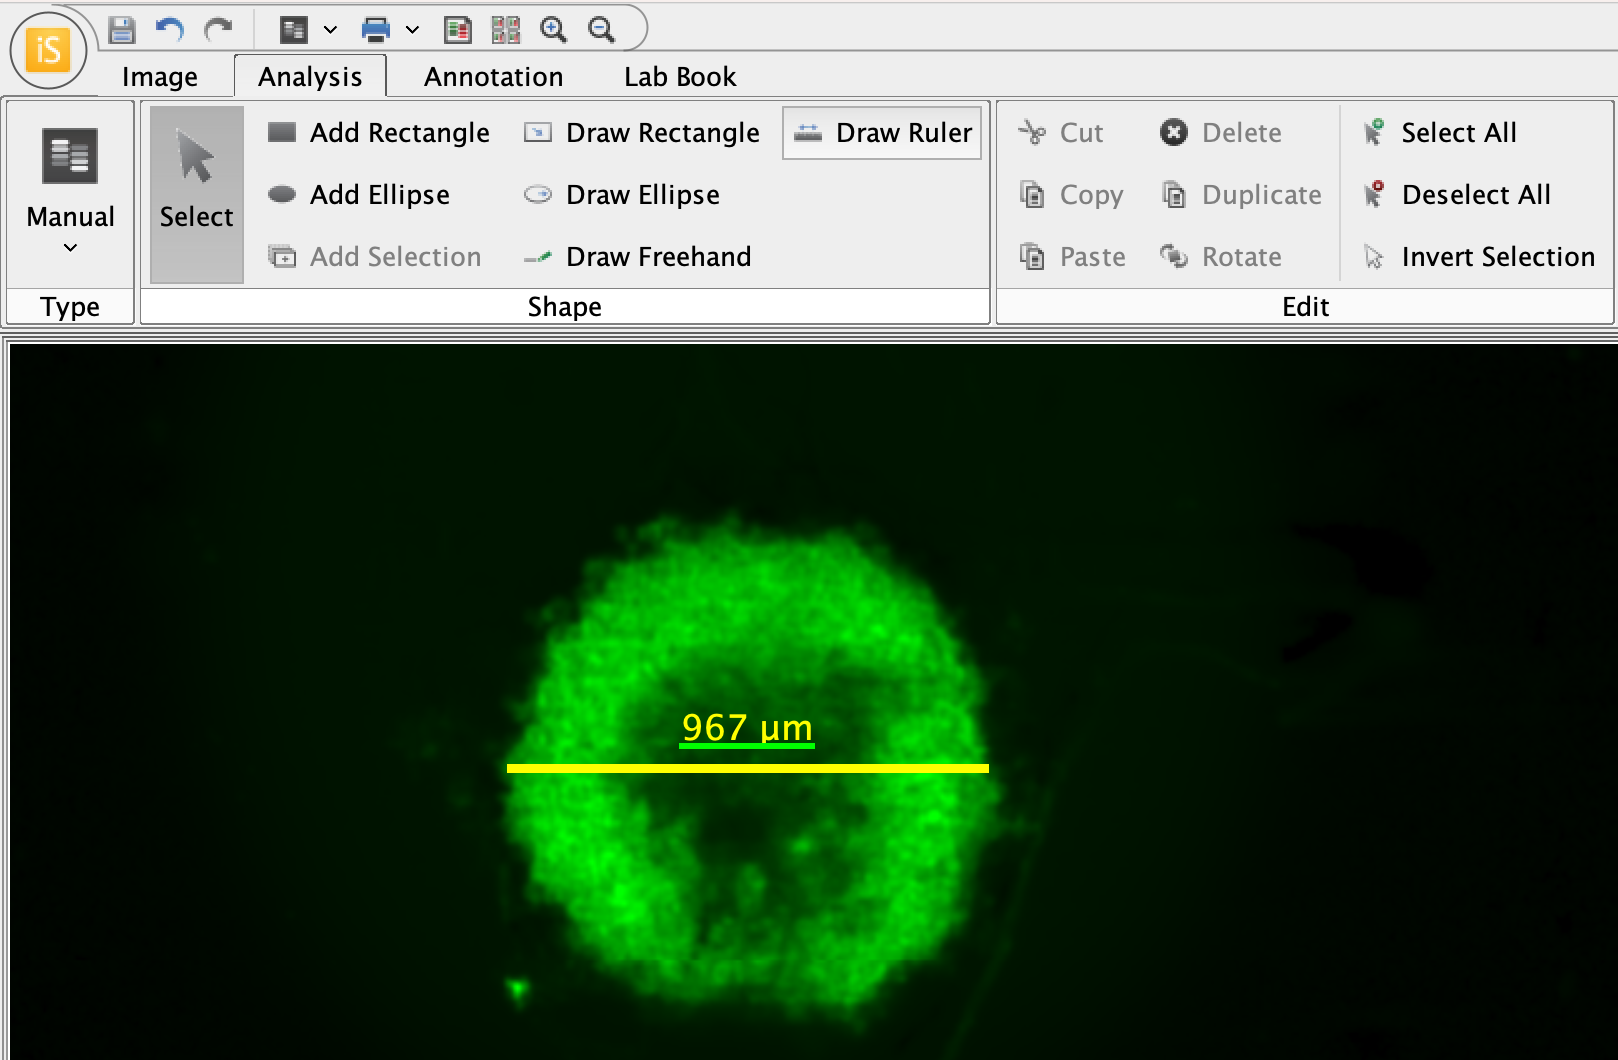
Added a dual-use measurement tool (Analysis ribbon > Draw Ruler) that can be used both as a ruler to measure regions of interest on an image and as a scale bar (newly available in version 6.1 for stand-alone Image Studio).
Tips: Hold Shift while clicking and dragging to keep the ruler horizontal (helpful for making a scale bar). Right click the ruler and choose Edit Ruler Properties to adjust ruler settings, including units.
-
Added Custom Color picker provides over 16,000,000 color choices for displaying image channels. Click the Custom Color button
 on the Display panel to see all your custom color options. The hex value editor allows you to precisely specify the color you want, and the Recent panel helps you reuse your favorite colors.
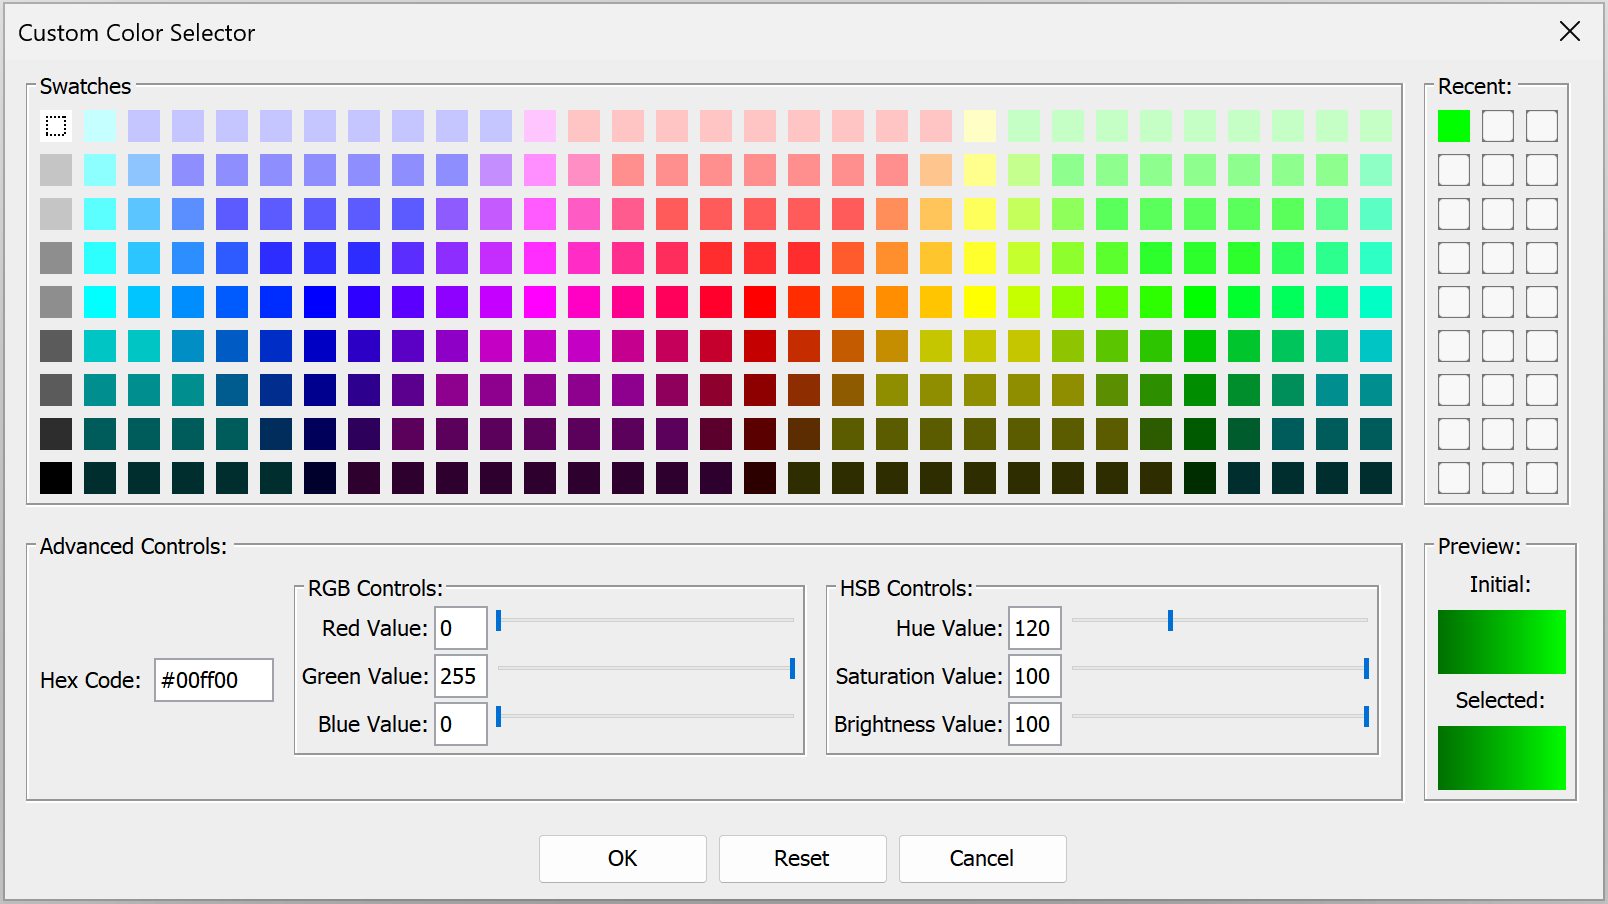
-
New Reset Colors button (in the Display panel) resets colors to the defaults you configure in Image Studio Ribbon.
-
Improved functionality when channel display buttons are clicked to work better with many new channels and color options. On first click of a channel display button, only the associated channel will be displayed. On second click, all channels will be displayed again using the color setting used before the channel display was toggled off.

Figure 10. Channel display button for an LICORbio Atlas™ Imager 375 channel. Click once to display this channel. Click twice to toggle on display for all channels in the acquisition. -
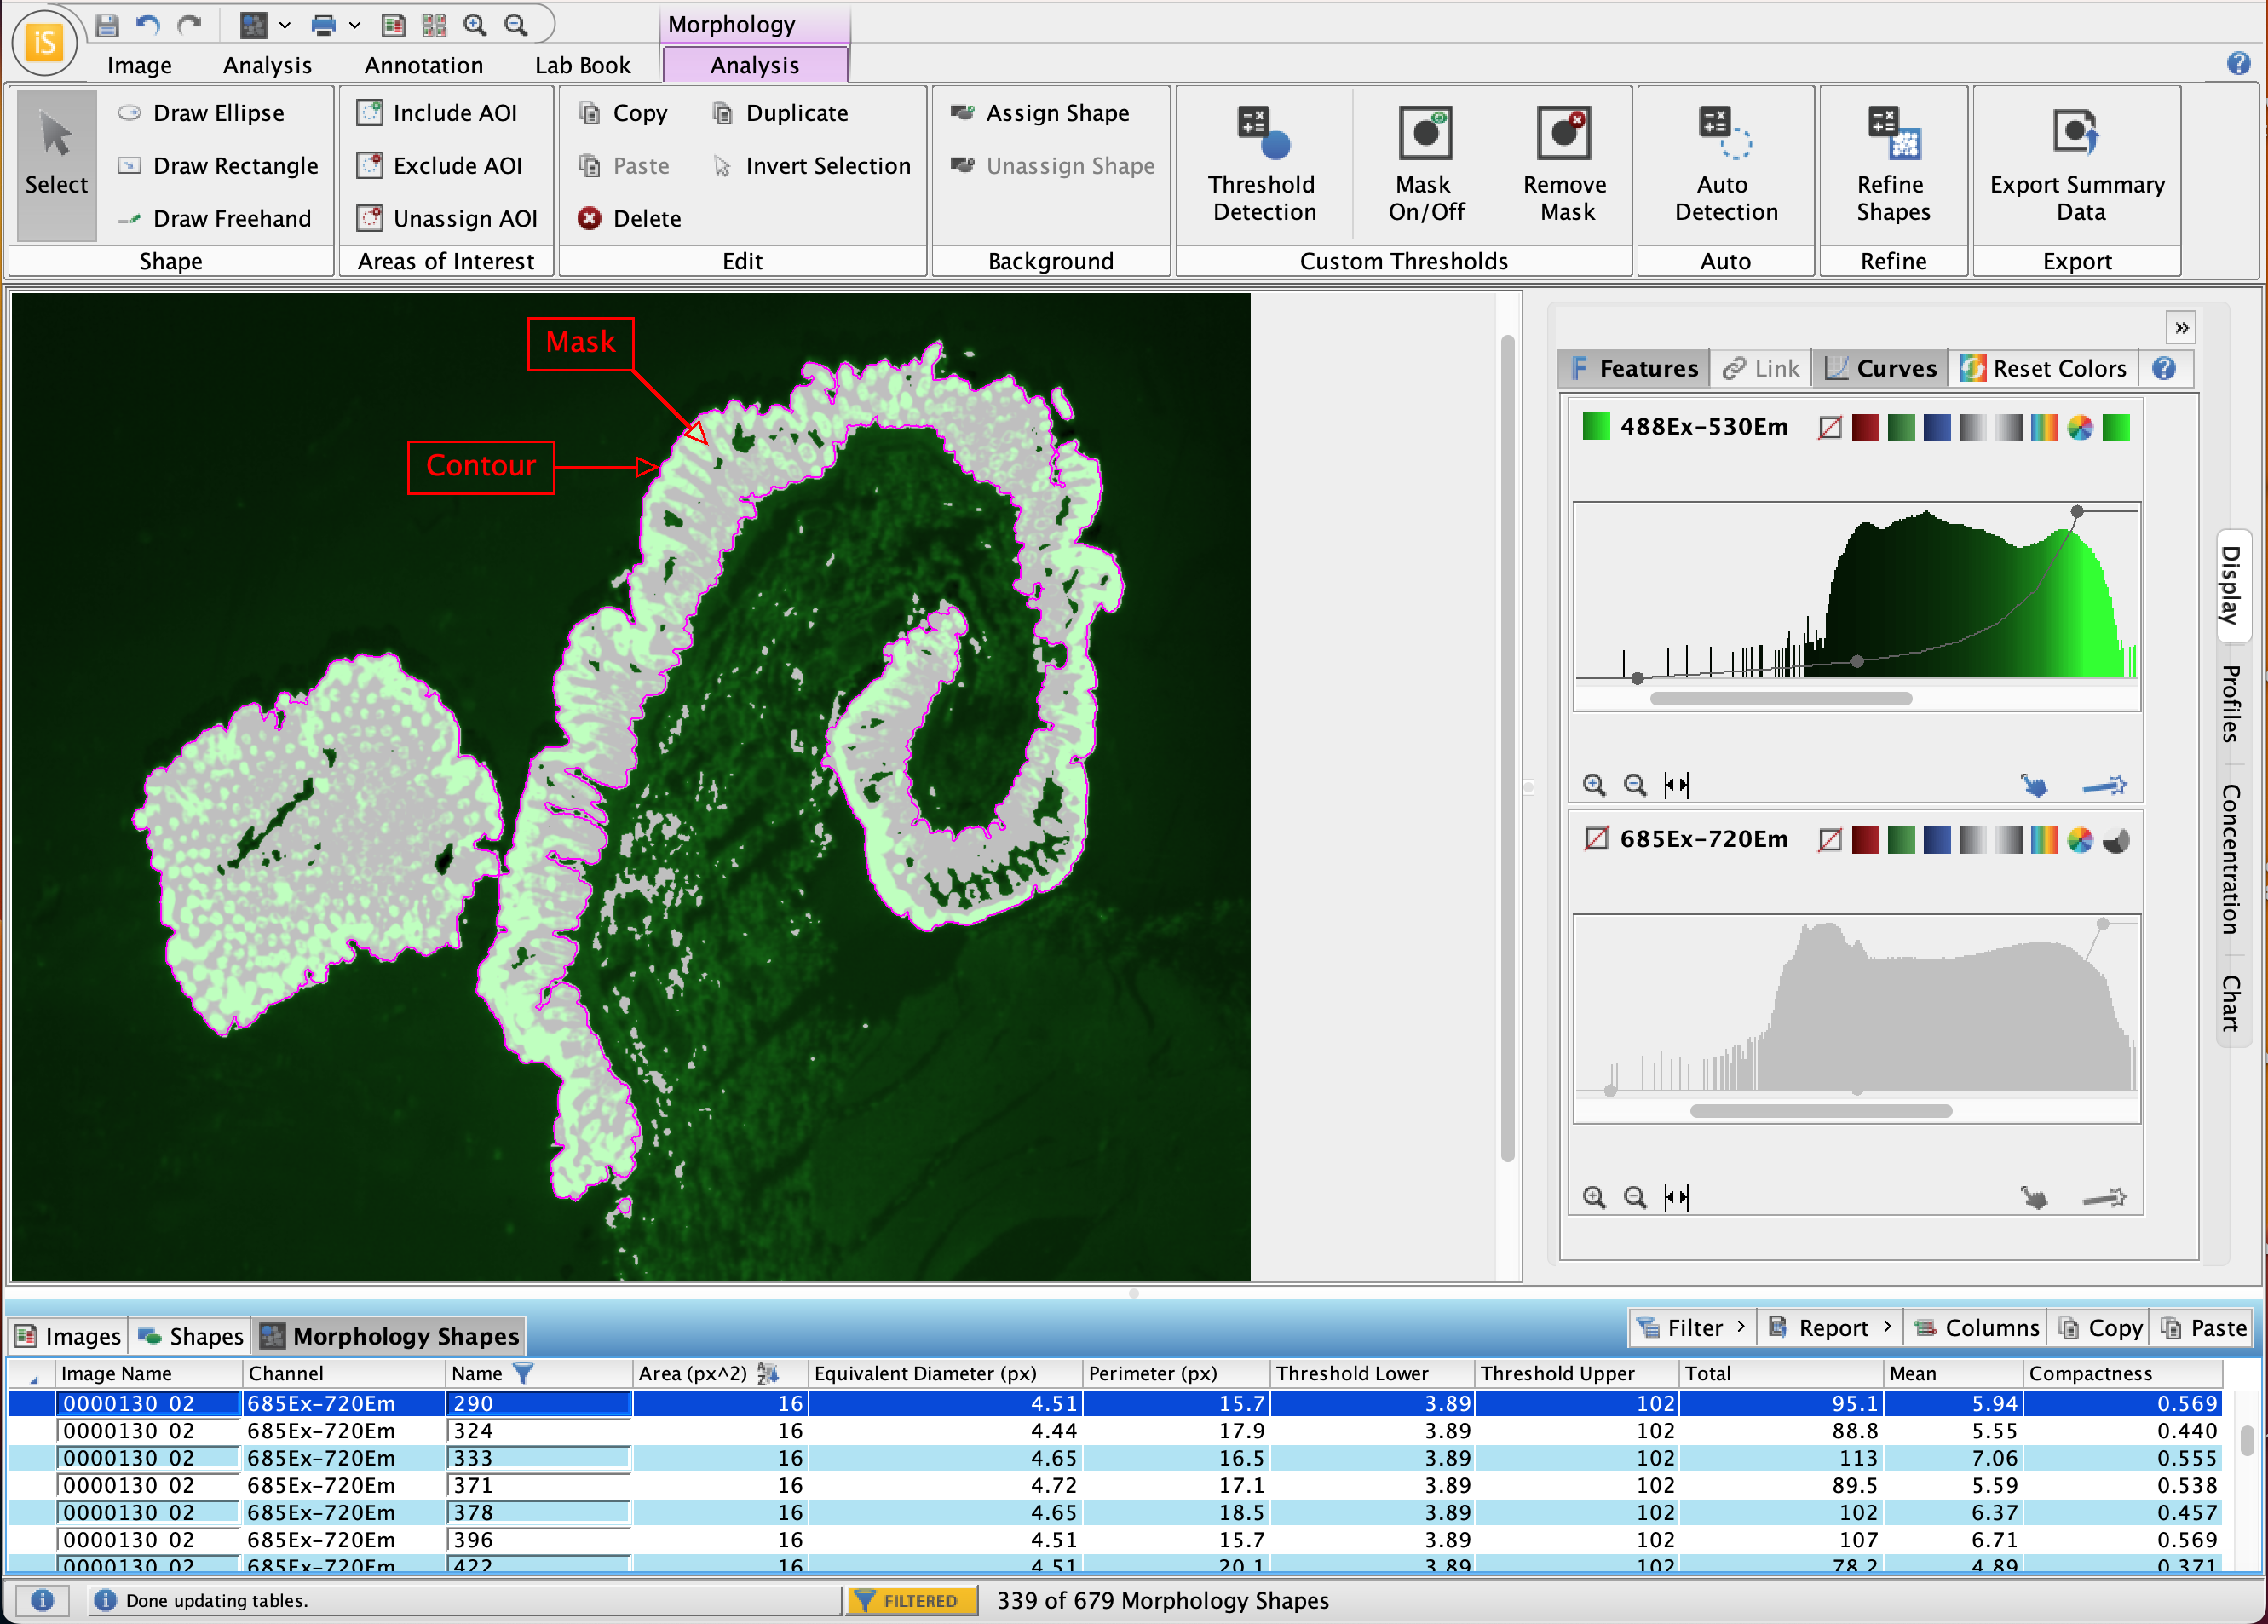
Added Morphology Analysis for thresholding, masking, and automatically identifying and measuring objects in an image, such as spheroids. Measurements include Area, Perimeter, Equivalent Diameter, Major Axis, Minor Axis, Centroid, Circularity, and many more.
Tip: Right click headers in the Morphology Shapes table to filter identified shapes (e.g., by Area).
-
Image Studio now makes more use of available RAM to improve computationally intensive processes.
-
Performance of crop functionality for high resolution images has been improved.
-
Fixed issue where grid spots were not always requantified when expected if the grid spots were clicked-and-dragged very quickly.
-
C-DiGit Corrected C-DiGit estimated scan time, which was previously incorrect if the Analysis Type was changed prior to scanning.
-
Odyssey MOdyssey F Improved Scan Preset list to show the last-used scan preset when a Work Area is reopened.
-
Odyssey MOdyssey F Changed scan order for multi-channel acquisitions to be performed with Chemi first and remaining channels scanned from longest wavelength to shortest wavelength.
-
Odyssey FThe bottom row of wells in 384-well plates is no longer clipped in scans. Previously, the bottom row of wells on 384-well plate scans was clipped on the Odyssey F.
-
Pearl Fixed bug that prevented Pearl Focus Position dialog from being opened.
-
Pearl Removed extraneous ".0" from Focus column for imported Pearl Imager acquisitions.
-
Added support for the Odyssey® M Imager and Odyssey F Imager - Image Studio 7.0 has all the new features for supporting the Odyssey M and Odyssey F that were introduced in Image Studio 6.0 (the latest stand-alone version of Image Studio that does not have 21 CFR Part 11-ready features). For more information about features for the Odyssey F and Odyssey M introduced in Image Studio 6.0, please see the version 6.0 release notes below.
-
Added a dual-use measurement tool (Analysis ribbon > Draw Ruler) that can be used both as a ruler to measure regions of interest on an image and as a scale bar.
-
Updated Java version to 17.0.11.
-
Fixed a bug that prevented spots in a grid from being re-quantified as-expected when the spots were moved (see the Image Studio 6.0 release notes for more information).
-
Improve the scan experience by persisting the last used Scan Preset Name after the client is restarted.
-
Fixed a bug that caused bands to be lost if custom Lane Names were entered and Image Studio was then closed and reopened.
-
Fixed a bug that caused the Acquire Ribbon > Flip Image setting to not be recorded consistently in the Flip Image column.
Image Studio 6.0 introduces support in Image Studio for acquisition and analysis with the Odyssey® M Imager and the Odyssey F Imager.
Specific changes include:
-
Support has been added for image acquisition with the Odyssey M and analysis of images from the Odyssey M, including:
-
New functionality for processing Epi and Trans images and support for RGB images
-
Tools to enable easily replicable scans with the plate alignment guide and slide holder
-
-
Support has been added for image acquisition with the Odyssey F and analysis of images from the Odyssey F, including:
-
Tools to enable easily replicable scans with the plate alignment guide and slide holder
-
-
New menu options are available for scanning with the plate alignment guide (926-18972) and slide holder (926-18971). The Odyssey M and Odyssey F use the same plate alignment guide (called “plate holder” for short in the software) and slide holder.
The new menu has three options. The three options are outlined below. For more detail on the three options, see the Odyssey® M Imager Acquire Tab topic or the Odyssey® M Imager Acquire Tab topic.
-
No Holder - Choose No Holder to see an open canvas for drawing scan areas anywhere on the scan surface. This option matches the functionality for Odyssey Imagers in prior versions of Image Studio, and is great for scanning membrane and gel assays.
-
Plate Holder - Choose Plate Holder to display a view with four plate areas. Select the plate area(s) that you want to scan.
LICORbio recommends using the plate alignment guide (926-18972) and the Plate Holder option when imaging plates on the Odyssey M and Odyssey F to help with consistent sample placement and scanning.
-
Slide Holder - Choose Slide Holder to display a view with twelve slide areas on which you can draw scan areas.
LICORbio recommends using the slide holder (926-18971) and the Slide Holder option when imaging slides on the Odyssey M and Odyssey F to help with consistent sample placement and scanning.
-
-
Added support for RGB images from the Odyssey M, including editing (crop, rotate, etc.), lookup table display adjustment, and lab book reports.
For third-party color TIFF imports, Image Studio 6.0 supports 8-bit, RGB color TIFFs. Attempting to import other third-party color TIFF images may not succeed, and a warning message with the text "Error Adding Acquisition" may be displayed.
-
Added an Invert button on the Image tab that inverts U16 (non-RGB Epi and Trans) images. The Invert option is intended for use on images where the sample region that you intend to quantify has lower pixel intensity than the image’s background (e.g., plate assays imaged in Trans channels).
-
Removed functionality that automatically inverted images on import based on a heuristic. The new Invert button allows the user to decide when to invert an image.
-
Updated the import feature to support RGB, Epi, and Trans images from the Odyssey M.
-
To transfer image acquisitions from LI-COR Acquisition Software to Image Studio, use the Export for Analysis option in LI-COR Acquisition software and the LICORbio Zip Files import option in Image Studio.
-
To transfer image acquisitions from Empiria Studio Software to Image Studio, use the Export for Analysis option in Empiria Studio software and the LICORbio Zip Files import option in Image Studio.
-
-
Default color choices for fluorescent channels have been set based on existing Image Studio conventions and to distinguish expanded channel selection. Color selections can be changed per acquisition in the Display panel and defaults can be changed in Application menu
 > Preferences > Image Display.
-
488: White-on-Black
-
520: Blue
-
700: Red
-
800: Green
-
-
Added support for image transformations (such as image rotation) on Epi and Trans images.
Note: Rotating Epi and Trans images works differently than rotating fluorescent images. If an Epi or Trans image is free-rotated to an angle that is not a multiple of 90 degrees, then "filler pixels" must be added to the image for the image to remain a rectangle. In fluorescent and chemiluminescent images, these filler pixels have the half-float value "NaN" (not a number) to indicate that the filler pixels have no quantification meaning. Epi and Trans images use integer values instead of half-float, so filler pixels added to an Epi or Trans image have the integer value "0". Because the filler pixels have a quantifiable value, be careful not to accidentally include filler pixels in shapes when you are quantifying regions of your Epi or Trans image.
If you do need to invert an Epi or Trans image, be careful to Invert the image as soon as you can after importing the image. If you rotate an Epi or Trans image and then invert, the filler pixels will be set to the maximum allowable integer value instead of the lowest allowable integer value (i.e., 0).
-
Updated the dialog for importing acquisition zip files to filter files by the
.zipfile extension. This makes it easier to find the zip file to import. -
Added detailed tooltips to channel selection options on the Acquisition ribbon, similar to the tooltips over channel selections in the Select Detection Channel dialog in LI-COR Acquisition Software.
-
Improved image metadata transfer for when images are imported from LI-COR Acquisition Software or when images from Image Studio are imported into Empiria Studio. The following image data columns from LI-COR Acquisition software to the Image Studio Image Table: Sample Up/Down (for slides), Scan Type, Specimen Type, Scan Position, Plate Well Format, and Biomarker.
-
Raised the number of channels that can be selected for an image acquisition on the Odyssey M to 6 channels (compared to 4 in LI-COR Acquisition Software).
-
Changed default export and import folder location to the user’s home directory instead of the location of the current Work Area.
-
Enhanced functionality for importing settings from existing Work Areas into the new Work Area when creating a new Work Area. The option to Import Settings from one Work Area to another is now located in the Create New Work Area dialog.
-
Added functionality to recalculate the Z′-Factor value shown on the In-Cell Western™ Analysis tab when the plate grid is moved and resized. (The Z′-Factor value exported in the Lab Book report was already updated after move/resize in previous Image Studio versions.)
Other Changes in Image Studio 6.0:
-
Set the Date/Time column of the Status Message History dialog to a fixed width that shows the full date/time, which enables you to expand the whole dialog to show more of the Status Message column without having to then reduce the width of the Date/Time column. A horizontal scroll bar has also been added to make it easier to read status messages.
-
The Desktop and
user.homedirectories are now recorded in the log files. This helps diagnose problems caused by Desktop oruser.homedirectories being mapped to network drive locations or syncing folder locations (like OneDrive). Image Studio supports local Work Areas, not Work Areas set on a network drive or syncing cloud storage location. -
Updated the Application button > Export Zip Application Log File functionality so that the export location can be chosen instead of placed only on the Desktop.
-
Removed outdated references to Connections Diagnostic utility.
-
The RSS feature no longer reaches out to the RSS feed to get more information. Click the RSS button to view more Image Studio information on the LICORbio website.
-
Added support for the Norsk negative sign in PDF exports. In previous versions of Image Studio, the negative sign was not shown in PDF exports.
-
Improved the Set Active Work Area dialog (the dialog that appears when Image Studio first starts) so that it appears over top of other open windows on the computer, which makes it much easier to find.
-
Upgraded to Java version 17.0.8.
-
Upgraded some third-party libraries (third-party libraries are listed at https://www.licorbio.com/support/answer-portal/software/index.html).