Open Image Studio 6.1 Work Areas in Image Studio 6.2
Image Studio 6.2 can open Work Areas from earlier versions. Once opened in Image Studio 6.2, a Work Area that originated in an earlier version will no longer open in that earlier version. Check with others in your lab before upgrading.
Best practice: Before opening a Work Area in a newer version of Image Studio, create backup zip files that contain the data from the Work Area. For instructions, see Moving Files from One Work Area to Another or Backing Up Work Areas.
Who Should Review This Topic
Review this topic before opening Image Studio 6.1 Work Areas in Image Studio 6.2 if the Work Areas include any of the following:
-
Rulers or scale bars that use pixel units.
-
Morphology Analysis results.
-
Saved grid-based analysis templates.
Ruler and Scale Bar
-
In Image Studio 6.2, ruler and scale bar values in pixel units are more accurate across images with different resolutions due to improved rounding procedures. When an Image Studio 6.1 Work Area is opened in Image Studio 6.2, rulers and scale bars set to display their length in pixels will be updated automatically.
-
Physical units (µm, mm, and cm) are reported accurately in Image Studio 6.1 and Image Studio 6.2. Values in these physical units do not change when a Work Area created in Image Studio 6.1 is opened in Image Studio 6.2.
Morphology Analysis
Morphology Analysis measurements may show small differences between Image Studio 6.1 and Image Studio 6.2. These differences are expected, minor, and should not affect conclusions.
When Image Studio 6.1 Work Areas Are Opened or Zip Files Are Imported in Image Studio 6.2
-
When a Work Area from Image Studio 6.1 is opened in Image Studio 6.2, Morphology Analysis values are displayed as they were saved.
If individual shapes are changed, those shapes are recalculated using Image Studio 6.2 calculation methods while unchanged shapes keep the values saved in Image Studio 6.1
If you edit a Morphology Analysis from an opened Image Studio 6.1 Work Area, such as moving or resizing one shape, only the changed shape is recalculated. Other shapes show values saved in Image Studio 6.1. Recalculate all shapes so the results can be compared consistently. To save time, you can save the original Image Studio 6.1 Morphology Analysis as a template and apply the template to the acquisition in Image Studio 6.2.
-
When a zip file from Image Studio 6.1 is imported into Image Studio 6.2, Morphology Analysis values are recalculated automatically. Imported values use Image Studio 6.2 calculation methods.
Why Values May Differ
-
Shape Boundaries and Perimeters - Image Studio 6.2 uses more precise shape boundary and perimeter handling.
-
Related Measurements - Differences may include slight increases in Area and Perimeter, with small related changes to values such as Compactness, Circularity, Centroid, and Solidity. Eccentricity, Major Axis Length, and Minor Axis Length may also differ slightly because ellipse, square, and rectangle boundaries are represented more accurately.
-
Feret Diameter - Feret Diameter values may differ by a few pixels because Image Studio 6.2 calculates Feret diameters directly, using shape rotation and improved boundary definition, instead of estimating them. Feret Diameter Min and Max values are also handled more consistently for user-drawn rectangle shapes. Note that these manually drawn shapes are unlikely to have morphologically relevant Feret Diameters.
-
Exported Values - Image Studio 6.2 improves pixel conversions in Morphology Analysis exports.
Template Naming Changes for Upgraded Work Areas
If the Work Area contains saved plate-based templates, be aware that template naming behavior is more strict in Image Studio 6.2 to help users better maintain clarity and data integrity.
-
Some template names are reserved and cannot be used for newly saved plate-based templates.
Reserved Template Names-
Custom
-
_Custom
-
None
-
Last Used
-
Names that start with a period or hyphen
-
6 Well
-
12 Well
-
24 Well
-
48 Well
-
96 Well
-
384 Well
-
1536 Well
-
6 Well Plate
-
12 Well Plate
-
24 Well Plate
-
48 Well Plate
-
96 Well Plate
-
384 Well Plate
-
1536 Well Plate
-
-
Plate configuration names, such as 96 Well, should not be used as template names.
-
Existing templates in older Work Areas are retained, but older naming patterns may not be allowed when saving new templates in the upgraded Work Area.
-
Template names are treated as case insensitive in Image Studio 6.2. For example, template names that differ only by capitalization are treated as the same name when you save new plate-based templates.
-
If a Work Area contains existing templates that use the same name with different capitalization, the existing templates and data are retained when the Work Area is opened in Image Studio 6.2.
-
If a Work Area already has missing plate configurations because a plate configuration name was used as a template name in an earlier Image Studio version, those missing plate configurations may not be re-created when the Work Area is opened in Image Studio 6.2.
Other Upgrade-Related Fixes
-
Opening older Work Areas is more reliable. Editing image metadata after upgrading from Image Studio 5.2 no longer leaves the application unresponsive.
-
Corrected a bug where exporting an unsaved grid analysis may result in incorrect values for spot areas and related calculations.
Moving Files from One Work Area to Another or Backing Up Work Areas
-
Open the Work Area that has the files you would like to move or that you would like to create a backup copy of.
-
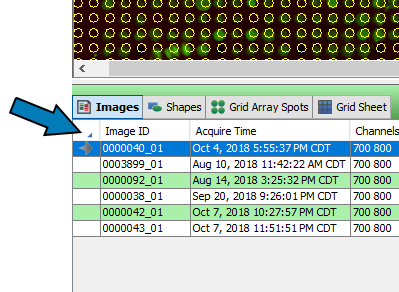
Once the Work Area is open, select the images in the Images Table (Ctrl + Click or Shift + Click shortcuts will work to select multiple files) that you would like to move. Avoid moving or backing up more than 200 images at a time. If you would like to select all the images in a Work Area click on the small arrow indicated below.
-
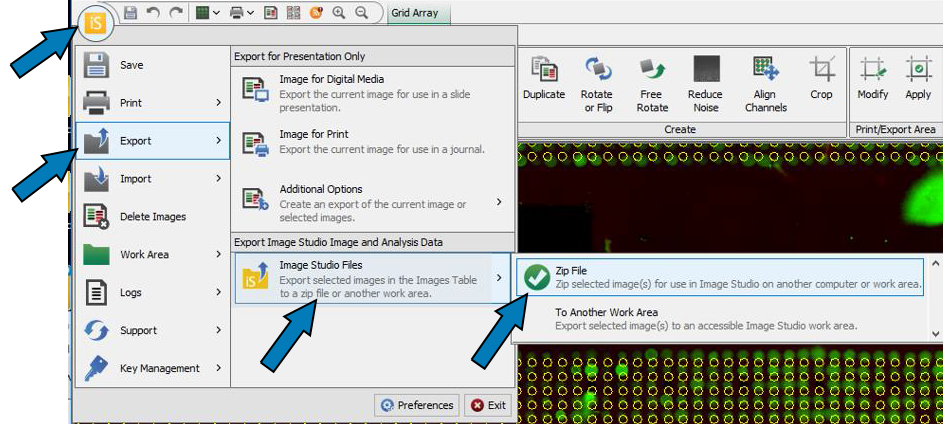
When the images have been selected, click on the round Image Studio button in the top left corner. From there, click on Export then Image Studio Files then Zip File as indicated by the arrows in the following screen shot.
-
A save dialog box will open that will allow you to save the zip file to a location of your choosing. The file name can be changed to help in organizing files. Click Save when you have browsed to the chosen save location.
-
If files were being moved, open the second Work Area and from the round Image Studio button this time choose Import then Image Studio Zip File and browse to the location the zip file was saved to in step 4 and select in by double clicking or selecting and clicking on Open in the bottom right corner.