LICORbio Atlas™ Imager Acquire Tab
The Acquire tab (shown below) contains controls for acquiring an image with the LICORbio Atlas™ Imager (model 3360).

Setup
Scan Preset
Scan presets can save you time and effort. Scan presets are a saved set of scan parameters. Use the Scan Preset list  in the Setup group to save the current settings as a scan preset, to select a previously saved scan preset, or to delete a selected scan preset.
Save Current Scan Preset
Once you have your scan parameters set the way you need, click Save Current Scan Preset to save the current scan settings as a scan preset. You can enter a name for the scan preset so that you can easily find this scan preset in the list and use it when needed.
The assay-specific scan presets provided with Image Studio provide scan settings that are generally a good starting point, but you can optimize settings for your assay and save your own custom scan presets as needed.
Apply Scan Preset
Choose a previously saved scan preset from the Scan Preset list by clicking its name.
Delete Scan Preset
To delete a scan preset, click Delete Scan Preset from the Scan Preset list.
Holder
Sample holders help ensure accurate and consistent placement of samples for consistent image acquisition. The Holder menu lets you choose which type of sample holder you are using. LICORbio recommends using the plate alignment guide (called a "plate holder" for short in the software) for imaging multiwell plates and using the slide holder for imaging slides. The same plate holder (926-18972) and slide holder (926-18971) can be used with the Odyssey F, Odyssey M, and LICORbio Atlas™ Imager.
Manual Scan Areas
Choose Manual Scan Areas for when you are not using a plate holder or slide holder.
Plate Holder
Choose Plate Holder when you are using plate holder (PN 926-18972). With the Plate Holder option chosen, a 2 x 2 grid of rectangles (representing four plates) will be shown.
To choose which of these areas the imager should scan, use these options from the Scan Area group:
-
Click Add and then click the plate area(s) corresponding to the areas where your plates are on the scan surface to designate those areas to be scanned. To exit Add mode, click Add again on the Acquire ribbon or press ESC.
-
Click Draw New to select a new scan area and remove any existing selected scan areas.
-
Click Delete (or press the Delete key) to remove any selected scan areas that you no longer want to scan.
Well Formats
The following dimensions are imaged within each plate area based on the Well Format that you choose.
| Well Format | X0 (mm) | Y0 (mm) | Width (mm) | Height (mm) |
|---|---|---|---|---|
| 6 Well | 5.8 | 3.8 | 116 | 78 |
| 12 Well | 11.8 | 3.8 | 104 | 78 |
| 24 Well | 5.8 | 3.8 | 116 | 78 |
| 48 Well | 9.8 | 2.3 | 108 | 81 |
| 96 Well | 9.8 | 6.8 | 108 | 72 |
| 384 Well | 9.8 | 6.8 | 108 | 72 |
Slide Holder
Choose Slide Holder when you are using slide holder (PN 926-18971). With the Slide Holder option chosen, a 3 x 4 grid of rectangles (representing twelve slides) will be shown.
To choose where the imager should scan, use these options from the Scan Area group:
-
Click Add to draw scan areas on multiple slides (one scan area per slide). To exit Add mode, click Add again on the Acquire ribbon or press ESC.
-
Click Draw New to draw a new scan area and remove any existing scan areas.
-
Press the Delete key on your keyboard to remove any selected scan areas that you no longer want to scan.
-
Click Duplicate to duplicate the selected scan area to all slides. When a scan area is duplicated, the duplicated scan area will replace scan areas drawn on other slides.
Analysis Type
Use the Analysis Type list  in the Setup group to specify the type of analysis to perform when an acquisition completes. You can also choose No Analysis to perform manual analysis.
If an analysis type is selected, the analysis is automatically applied when the acquisition is complete. The previous analysis will be used unless a different analysis is chosen.
Possible analysis types are listed below. Click a link to open the help topic for that Analysis Type.
- Morphology Analysis
- Plate Analysis
- Plate Array Analysis
- Grid Analysis
- Grid Array Analysis
- In-Cell Western™ Analysis
- Small Animal Image Analysis
Image Table Info
To enter values for user-editable columns in the Images table:
-
Click Image Table Info
 in the Setup group.
The Image Table Information will open.
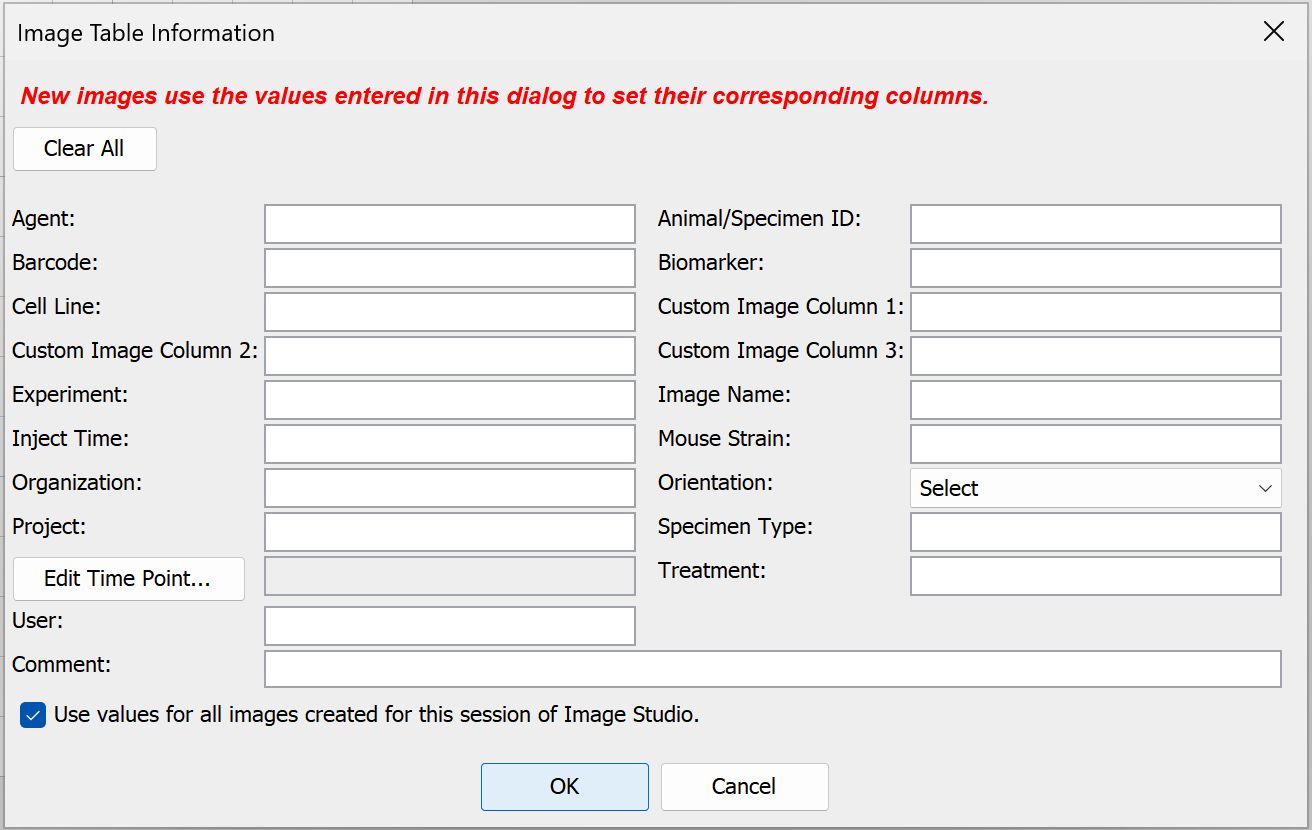
- In the Image Table Information, enter values in any available field.
- Click OK. The values you entered will be saved to the Images table for the acquisition.
Select Channels
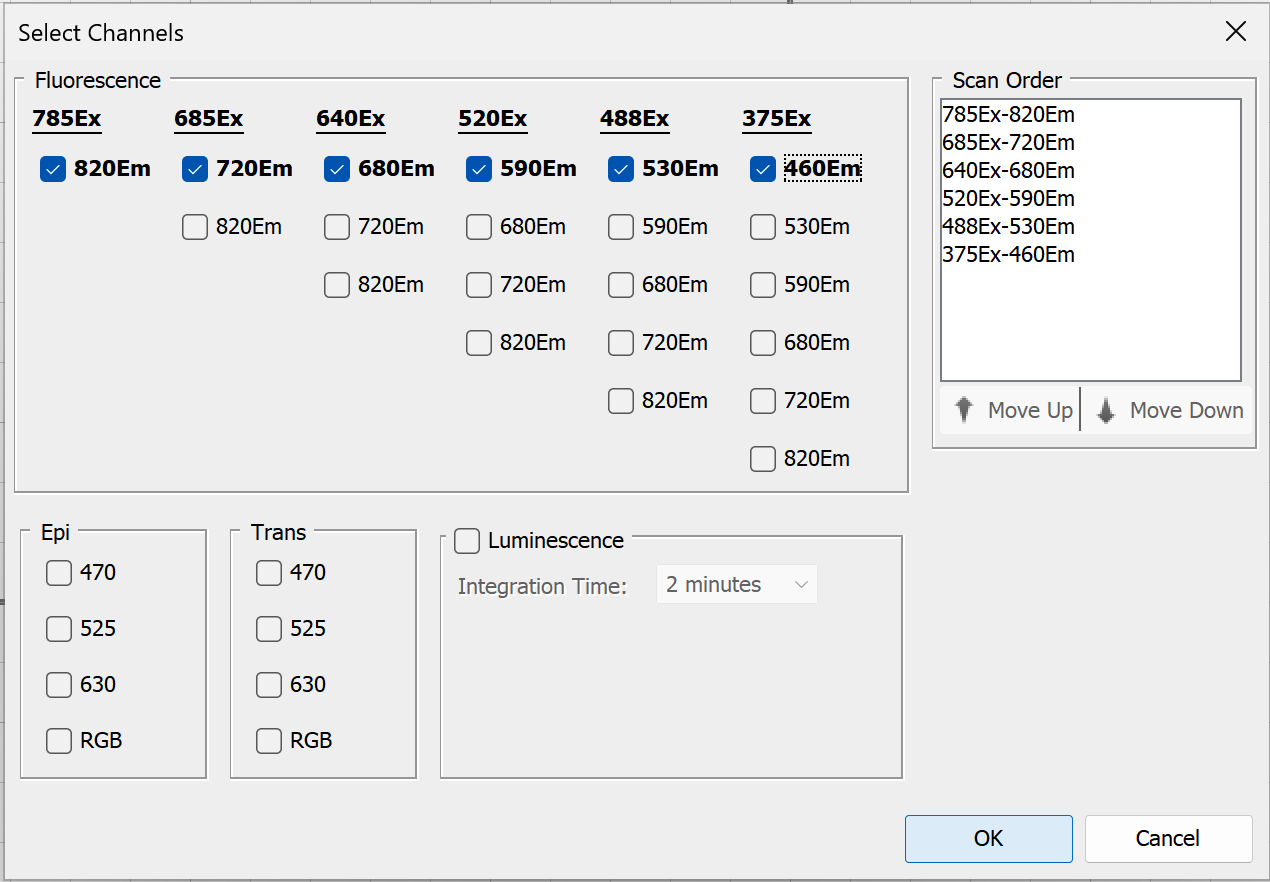
In the Channels group, click Select Channels to choose which channels to scan and related options.
-
Up to six channels can be imaged in a single acquisition.
-
Adjust the order in which channels are scanned using the Scan Order list. You can click and drag channels in the list, or select the channel you want to move and click Move Up or Move Down.
-
To set a specific integration time when imaging luminescence, select the Luminescence checkbox, then choose Custom from the Integration Time list.
-
When you have selected the channel options you want, click
OK .Your channel selections will the displayed in the Channels group.
Once an image is acquired, channels in the acquisition can be viewed individually or overlaid.
Select Focus
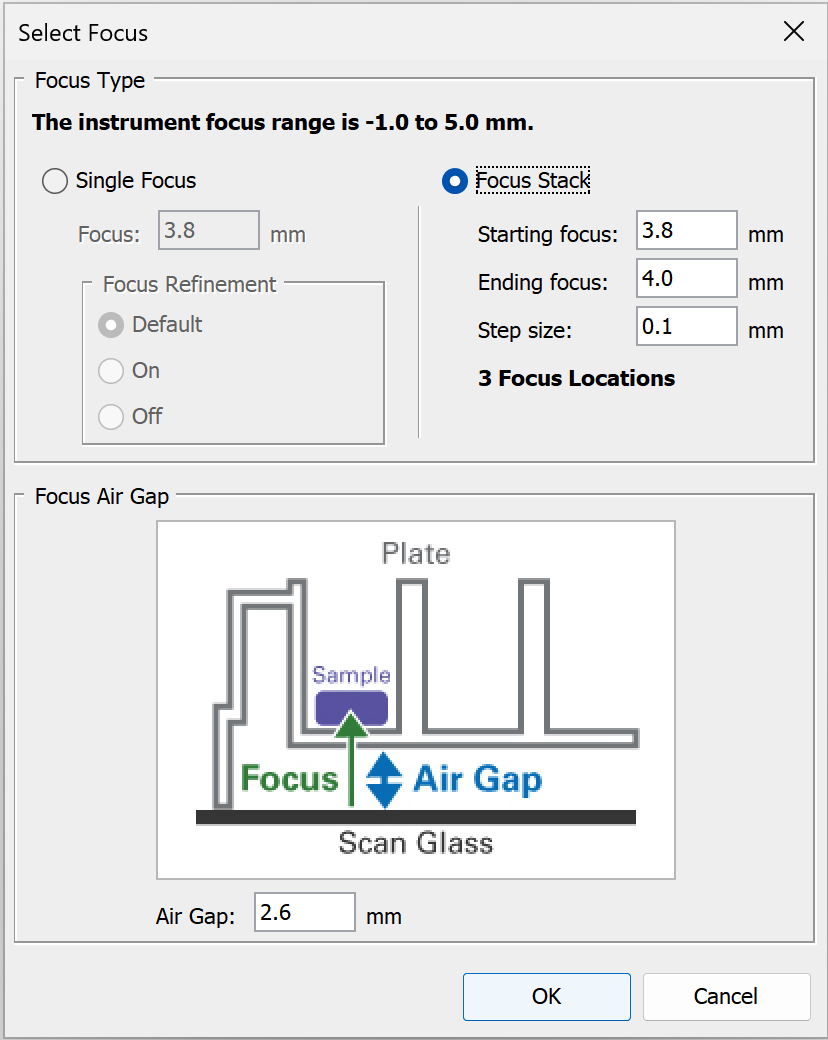
In the Focus group, click Select Focus to choose a single focus offset, focus stack, and set the air gap. The diagram and some controls in the dialog will vary based on the Holder Type selected.
Single Focus
Choose Single Focus to acquire image(s) at just one focus position.
Focus Refinement is an option that automatically makes fine adjustments to the focus offset that is entered, if a better focus offset can be determined automatically by the imager. For some types of scans, the imager will automatically run the focus refinement routine unless you toggle it off. Focus Refinement is not available for the Odyssey F.
-
Default - Use the imager's default for when the focus refinement algorithm is used.
-
On - Run focus refinement regardless of the imager's default setting.
-
Off - Do not run focus refinement regardless of the imager's default setting.
Above the Images table, click Columns to add Focus Refined (focus offset value found when Focus Refinement is used) and Focus Refinement Setting to see which Focus Refinement setting was used to acquire an image.
Focus Stack
Choose Focus Stack when you want to automatically acquire images at a series of focus offsets. Focus Stack creates a z-stack of image acquisitions. You can use the z-stack to find the best focus offset or to create a projection image (not supported for RGB images). Available projection types include Maximum Intensity, Mean, Median, Minimum, and Standard Deviation. Standard Deviation projections can help show where intensity varies across the z-stack.
-
When Focus Stack is selected, the focus refinement algorithm is not used.
-
Focus Stack values can be entered in 0.01 mm increments.
-
The z-stack will be acquired from the Starting focus to the Ending focus in the increment you specify. You can enter the low or high focus offset as the Starting focus or Ending focus.
For example: If you enter a low focus offset as the Starting focus, then the z-stack of images will be acquired in the increment you specify until the high focus offset set as the Ending focus is reached.
-
In the Images table, click Columns and add the Focus Stack Name. The Focus Stack Name is used to group all acquisitions that are part of the same z-stack.
Air Gap
The Air Gap is the distance between the scan surface and the sample or vessel that contains the sample. For multiwell plates, set the Air Gap to the distance between the scan surface and the bottom of the well. To get this information, you may need to refer to the manufacturer's documentation or contact the manufacturer. For plates provided by LICORbio, check the pack insert.
Scan Controls
Use options in the Scan Controls group to set the Resolution, Quality, and Focus Offset. Use Flip Image to automatically show the acquired image flipped top to bottom (useful for multiwell plate images).
- Scan Resolution— This is the distance the scanner travels between readings. Shorter distances will give higher resolutions that provide more image details but create large image files. Longer distances will give lower resolutions that provide small image files but do not offer fine image details.
- Flip Image — When selected the image is automatically flipped top to bottom.
Scan Controls for Plates
The LICORbio Atlas™ Imager can acquire images of entire 6-, 12-, 24-, 48-, 96-, and 384-well standard-sized plates or individual wells from standard 6-, 12-, 24-, 48-, 96-, and 384-well plates. Only one plate format can be chosen per scan preset configuration.
To see plate imaging options, ensure the Holder Type is set to Plate Holder.
Image entire plate
When 5 µm resolution is needed, LICORbio recommends considering scanning individual wells instead of scanning the entire plate.
-
In the Scan Controls group, choose Scan Plate.
-
Click Add in the Scan Area group and then select the plate areas you want to scan. To exit Add mode, click Add again on the Acquire ribbon or press ESC.
Image individual well(s)
-
In the Scan Controls group, choose Scan Wells.
-
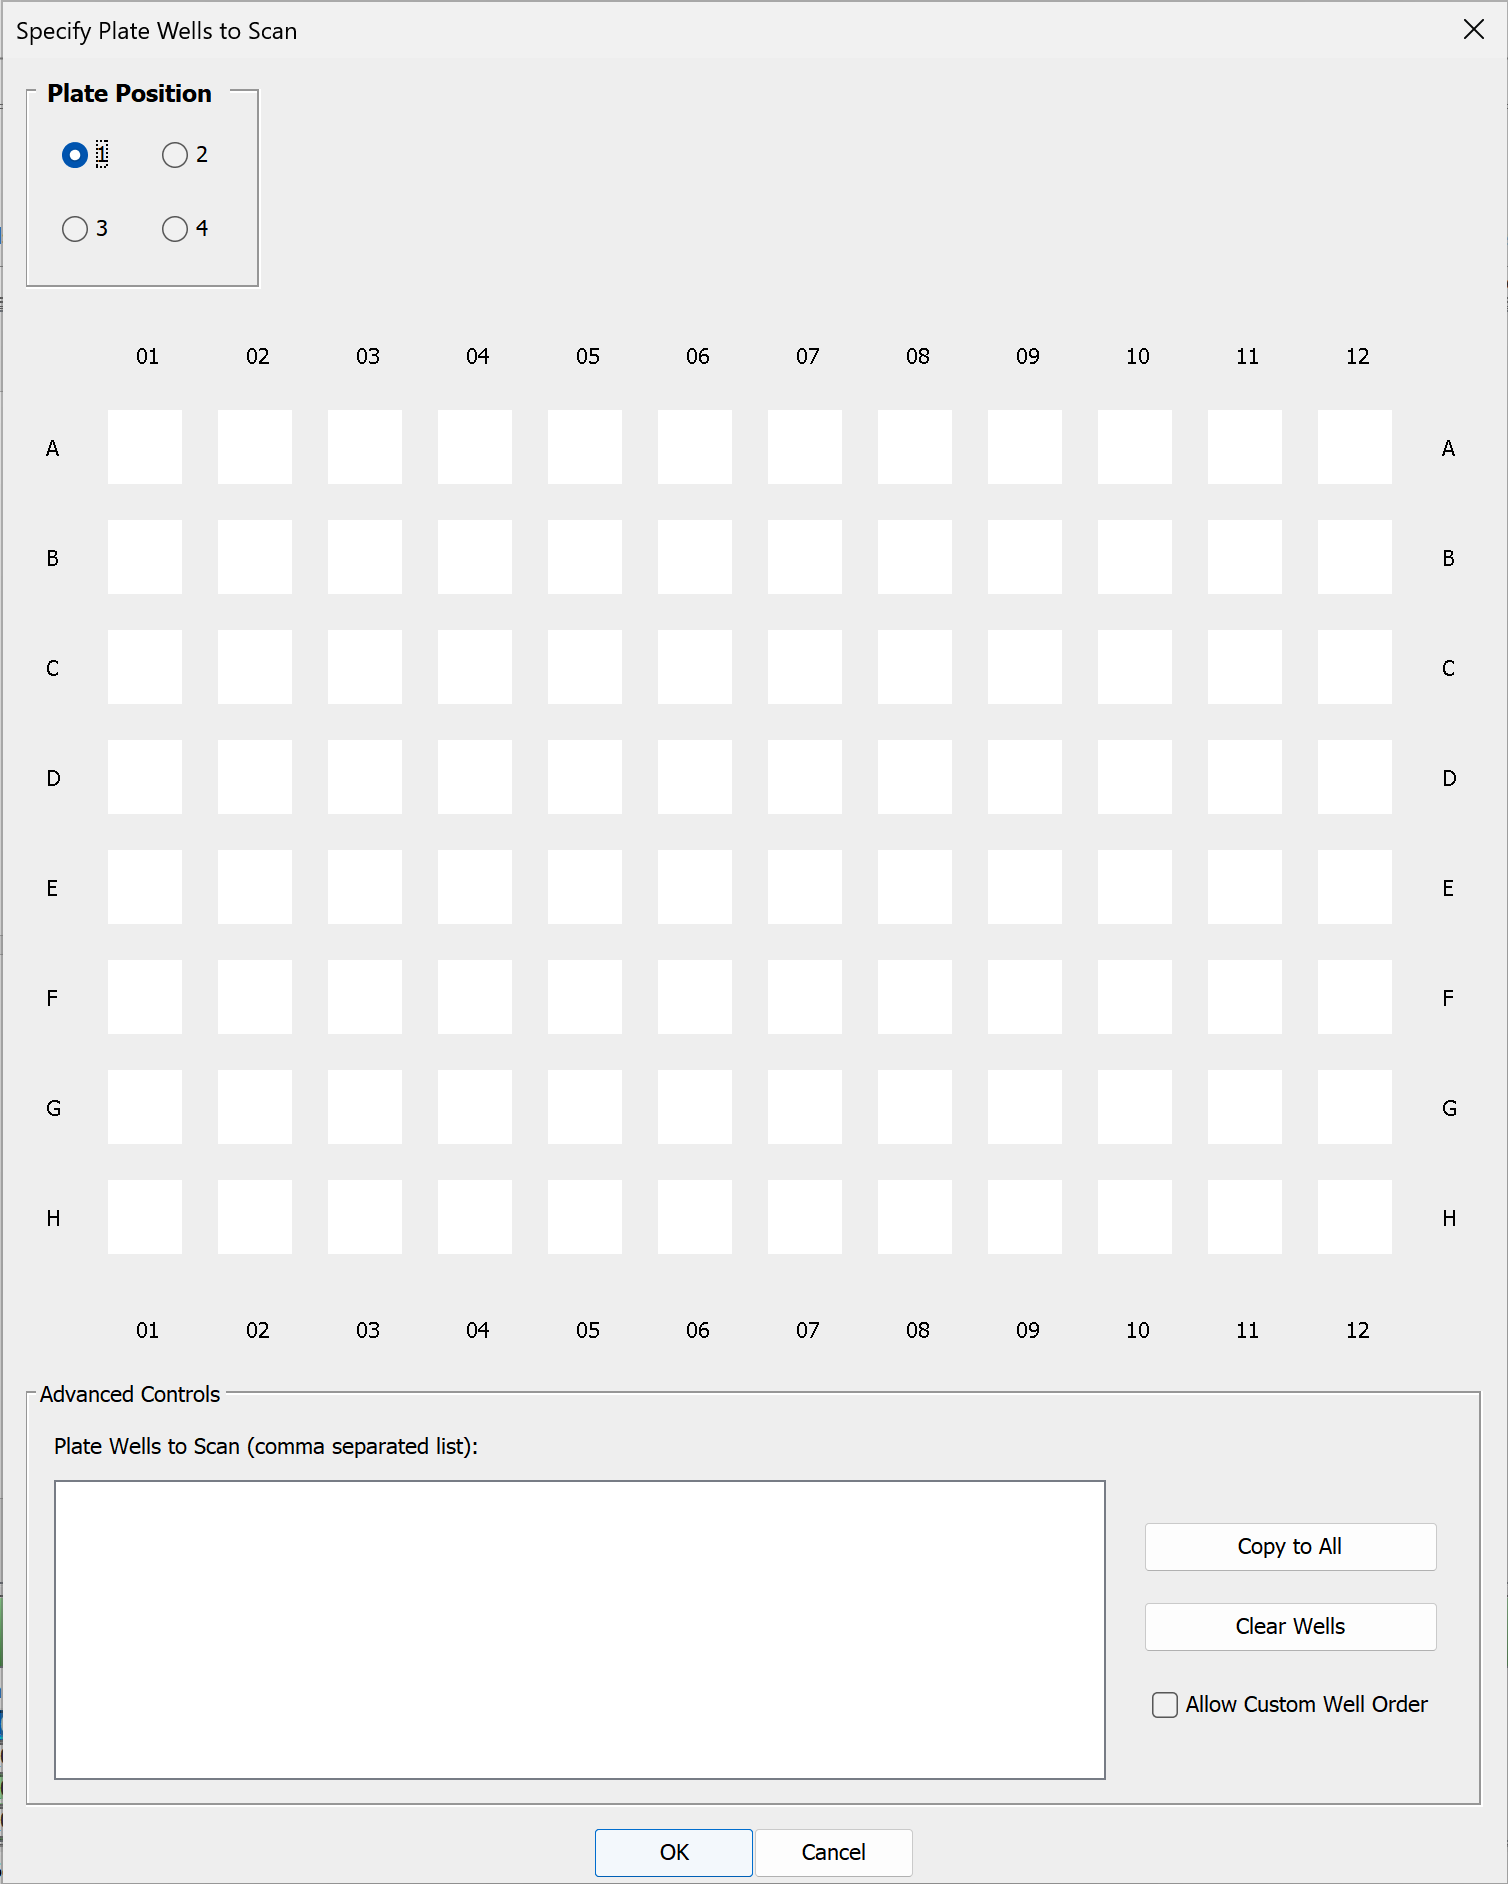
In the Scan Controls group, click Specify Wells to choose which wells to scan. The Specify Plate Wells to Scan dialog will open and provide options for choosing the wells you want to scan.
-
Check the Plate Position at the top left of the dialog to ensure that you are adding wells to the correct plate position.
You do not need to add a plate area before choosing wells. Selecting a Plate Position and choosing wells for that Plate Position will cause the correct plate area to be added after you click OK in the Specify Plate Wells to Scan dialog.
-
In the plate schematic shown in the dialog, click to choose wells to scan. Click and drag to select many wells. Click again to remove a selected well to not scan that well.
-
Click Copy to All to copy selected wells to all plate positions.
-
Click Clear Wells to remove all selected wells.
-
You can select Allow Custom Well Order and enter well names in the Plate Wells to Scan text area to scan wells in a particular order, but this is unnecessary in most cases.
-
When you have made your well selections, click OK.
-
Scan Area
There are three choices for which image to display in the scan area:
- No Image — Do not display an image in the scan grid.
- Current Image — Display the current image from the image table in the scan grid.
- Last Acquired — Display the last acquired image in the scan grid.
Use the other controls in the Scan Area group to determine the area(s) of the scan bed to image.
- Draw New — Draw the scan area by clicking the image at the upper left point and dragging the mouse to the lower right point of area to scan. Click and drag (move) the scan area rectangle for further refinement. Any previously existing scan regions are replaced by this scan area.
- Split — Split selected scan areas into multiple regions. The selected scan areas are split and evenly spaced in a row/column format. Multiple selected scan areas can optionally be merged into one area before splitting.
- Add — Add a new scan area by clicking the image at the upper left point and dragging the mouse to the lower right point of the new area to scan. Click and drag (move) the scan area rectangle for further refinement. To exit Add mode, click Add again on the Acquire ribbon or press ESC.
- Copy — Copies selected scan areas. A new scan area is created and selected that can be moved or resized.
- Scan Area Location — Displays the X, Y, Width and Height controls for the selected scan area. The Acquire Image View cursor location is also displayed.
Scanner
Use the controls in the Scanner group to Start the scan. Use Preview to show the image as it is being scanned. When enough scan settings are selected, the Status group shows an estimated scan time before you start the scan. The estimate updates as scan settings change.
- Start — Starts the image acquisition using the currently displayed parameter values. The status of the acquisition is displayed in the Status group. It also shows the channel being acquired, and the acquisition is listed in the Images Table.
- Preview — Creates a fast, low resolution preview image.
- Cancel — Cancels the current acquisition. All existing and pending channel images are canceled.